
Facebook allows us to upload videos in almost all popular video formats like AVI, MP4, WMV, MOV, FLV, ASF, etc. to share with the world. But you're totally lost when you want to upload DVD to Facebook to share with your family and friends since Facebook only supports videos that are less than 20 minutes and smaller than 1024 megabytes. If you're looking for a way to post your favorite DVD videos to YouTube, here's a quick guide to help you get started.
Since DVD is not supported by Facebook and DVD files are always too huge for Facebook, what you need to do is to convert DVD to Facebook supported video formats (H.264 MP4 or MOV is highly recommended) and cut DVD into multiple smaller clips that can be accepted by Facebook. To do this, a DVD ripper and editor is needed. Luckily, the best DVD Ripper for Windows from EaseFab just meets your needs. With it, you can fast rip videos from DVD for sharing on Facebook and trim the videos into multiple segments with short duration. Why choose EaseFab DVD Ripper? Let's go deep into this program.
Lossless rip DVD to Facebook format within 5-minutes
* Convert DVD to Facebook Video in 6X faster speed than others
* Configured preset format for Facebook, YouTube, Vimeo, etc.
* Extract DVD Video and audio to MP4, FLV, MP3, MOV, MKV, etc.
* Personalize DVD movies by trimming, adding watermarks, changing effects
How to convert DVD to videos for posting on Facebook
Note that the product tutorial below uses DVD Ripper for Windows screenshots to show you how to get the work easily done. The way to rip DVD to Facebook videos on Mac OS X (including El Capitan and Yosemite) is the same. Please just make sure you've downloaded the right version.
Step 1. Load DVD movies
Add the DVD files you want to rip to the program by clicking "Load DVD" and selecting DVD files. You can also add ISO and IFO files. Added files can be previewed and you are free to take snapshots of the movie scenes.

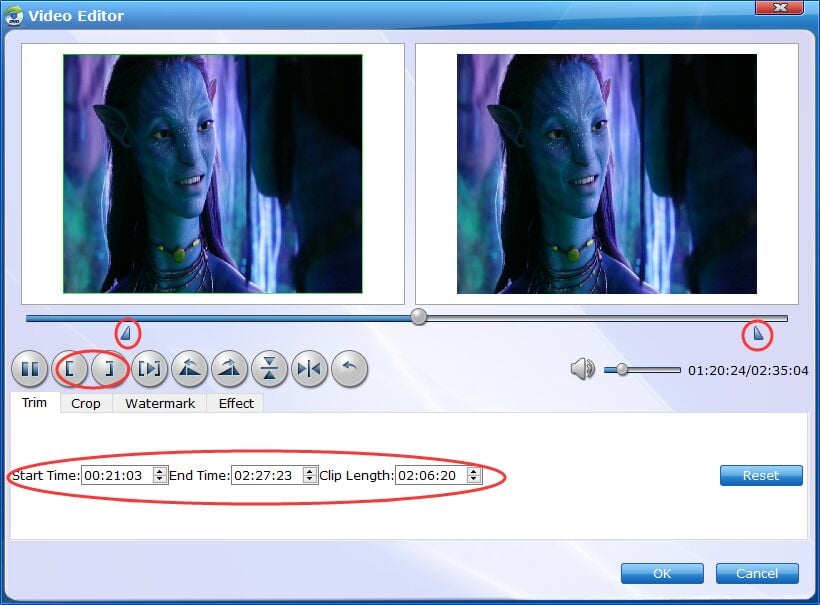
Step 2. Edit your movie(Optional)
Click Edit button to enter the Video Editor Window. As you see, you can trim, crop or adjust the video with the built-in video editor to get the very part and effect of the movie you want. (Note that Facebook won't accept videos that are longer than 20 minutes. You need to cut or split the DVD movies into smaller parts so as to share on Facebook.)
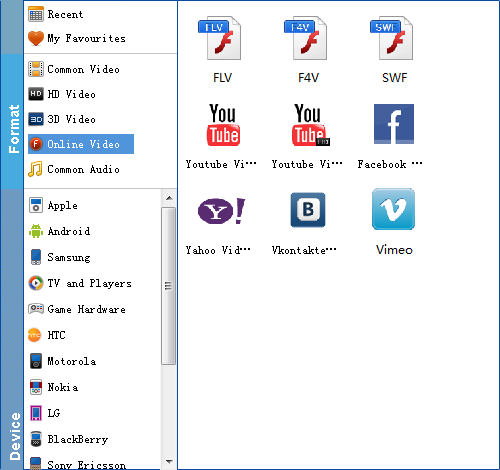
Step 3. Choose Facebook as the output video format
Next, specify the output video format. You don't need to be confused about what format to choose. Video preset for Vimeo has been provided. Just click "Profile", go to "Online Video" category and set "Facebook" as your output video format.
Step 4. Start ripping DVD movies
Click "Convert" to start ripping DVD movies to Facebook and wait for the conversion to be done. After the conversion, you can freely share the video files on your Facebook with more people.
Note: When converting DVD movies to Facebook MP4 or MOV, make sure the larger edge of your video does not exceed 1280px and the time/size limits you see on the upload page. For more information about Facebook video uploading, please refer to: https://www.facebook.com/help/search/?q=video+format