How to Rip and Upload DVDs to iCloud for Streaming or Storage


Summary: Here is a simple guide on how to convert homemade/commercial DVDs to iCloud friendly formats, so you can place your favorite DVD videos into iCloud for streaming or storage with ease.
Physical DVD discs are indeed not as convenient as digital files, but your probably still have a DVD collection. You can certainly watch these DVDs the usual way, with a DVD player, but wouldn't it be great to save your favorite movies on DVDs on iCloud so that you can access them from any Apple device, whether it's an iPhone, iPad, Mac, or web browser? Of course, you cannot directly upload DVDs to iCloud, whether it's homemade DVDs or store-bought commercial DVDs. But the process is very simple if you have a proper DVD ripping tool at hand.
In this article, we will show you how to convert DVD to iCloud-friendly formats with optimal settings and quality. Also you will learn how to upload the ripped DVD movies to iCloud for later streaming, playback or storage.
Table of Contents
Part 1. What's the Best Formats for Ripping DVD to iCloud?
Before we start ripping DVD movies for storing on iCloud, let's figure out which formats iCloud can accept. According to Apple, iCloud supports MP4, MOV, HEVC, H.264 and MPEG-4 file formats. You can often upload HEVC, MP4 and MOV files to iCloud without conversion and iCloud stores videos in their original formats.
The "best" video format for iCloud depends on your goal: use HEVC (H.265) for optimal space savings on your Apple devices, or use MP4 (H.264) for the best compatibility with non-Apple devices.
Conclusion:
- For Apple ecosystems and storage efficiency, you can rip DVD to HEVC for iCloud. This is the default on most recent iPhones and iPads and HEVC offers better compression and smaller file sizes than H.264 MP4 while preserving high quality.
- For broad compatibility, ripping DVD to H.264 MP4 is recommended since this format universally compatible across almost all devices and platforms.
Part 2. What's the Best Way to Rip DVDs to iCloud?
There are many programs out there that allow you to digitize DVD collection. Handbrake is a popular free DVD ripper among users running Windows, Mac, and Linux. Handbrake is free to rip CSS and region-locked discs to MP4 and MKV, if with libdvdcss installed. But the annoying thing is that libdvdcss doesn't always work and the interface is complicated to understand and use.
But if you don't want to be held back by slow processing and poor output quality and look for an easy option to transfer DVD to iCloud, EaseFab DVD Ripper is there for you. This software is available to cope with both home-made and store-bought DVD discs without hassle. It can easily and fast rip DVDs to iCloud formats with best quality in a smaller file size.
- It can rip DVD to iCloud supported MP4 (H.264/HEVC), MOV, M4V, MP3, AAC, M4A etc. without quality loss.
- It can rip all encrypted DVDs to iCloud, incl. DVDs with region codes, RCE, CSS, bad sectors, 99 titles, ARccOS, UOPs, APS, etc. without using 3rd-party software.
- It can rip DVDs to Plex MP4 smoothly at a 5x faster speed than others with support for Intel/NVIDIA hardware acceleration.
- It can compress DVD for iCloud by 80% smaller, adjust video/audio settings, trim, crop, merge, deinterlace, add external subtitle.
Download and install the DVD to iCloud converter on your computer and follow the simple guide below to start ripping DVDs to iCloud compatible file formats. The guide below takes the Mac version for example. The process on Windows PC is same.
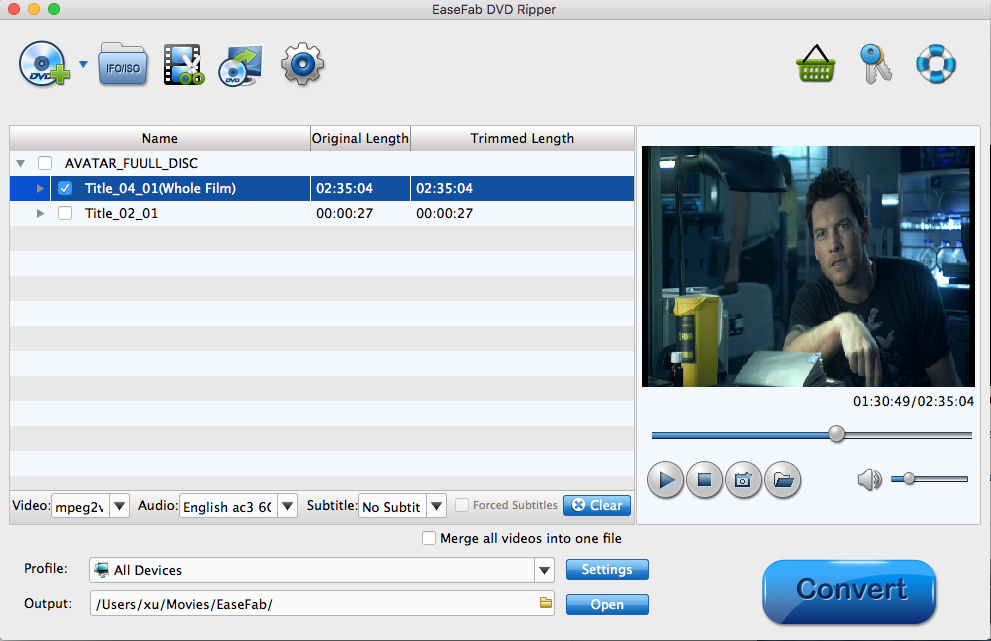
Step 1. Load the DVD you want to upload to iCloud.
Insert the DVD disc to the DVD-ROM and then launch EaseFab DVD Ripper. Click "Load DVD" button to import the DVD. Namely, if the DVD is protected, it will detect the encryption, remove it, and automatically find the correct title of the DVD.
Besides physical DVD discs, you can also load ISO image and Video_TS folder and convert them to iCloud compatible formats.
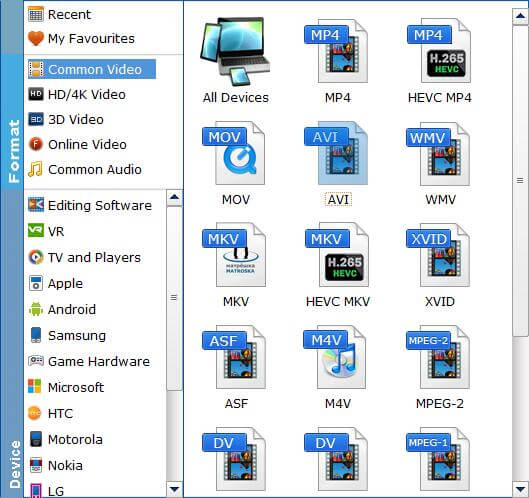
Step 2. Choose a proper output format for iCloud
Click the "Profile" bar and select an output format to rip your DVD for iCloud. For broad compatibility, "MP4" (codec: h264+aac) in "Common Video" category is recommended. You can also choose HEVC MP4 as the output format if you want to stream and play DVD movies on recent Apple devices.
The end results (H.264 MP4 or HEVC MP4 videos) are small in size while still looking amazing. Plus, you can adjust the settings to fit what you need. Below are some useful tips for encoding and compressing DVD files for iCloud.
1. To compress DVD file and save space for iCloud.
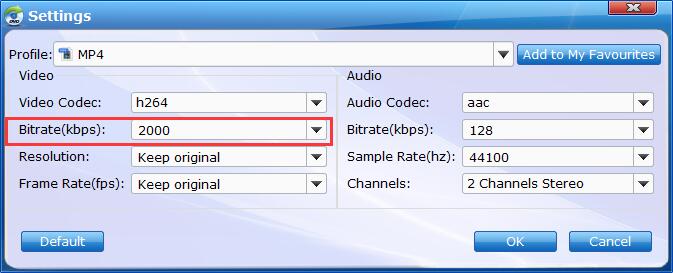
For advanced users, flexible options are offered to further reduce the size of the ripped video. Click Settings button below the profile and enter into the parameter settings page. A slew of other variables such the video/audio codecs, pixel dimensions, frame rate, bit rate, audio sampel rate, etc. will help convert a DVD at 7.5GB to a smaller MP4 file to make more room for your iCloud. Here are the recommended settings:
- 1. You're not suggested to adjust the frame rate and aspect ratio, if not necessary.
- For video quality, choose H.264 or H.265 codec. They keep the file size smaller without sacrificing much quality.
- 2. You can lower the "bitrate" (from "normal quality" (2400kbps) to around 1800-2000 kbps in our tests). This won't make the output MP4 video blurry.
- 4. Lower the resolution. The standard DVDs are 720×480 or 720×540. Dropping to 640x480 won't affect quality, but lower resolutions will make the file smaller.
![]() Please note: Tweaking these settings can shrink your file size, but be careful! Smaller files mean some quality loss. Want to keep DVD quality? Choose MP4 - it keeps the file size around 1.2GB-1.6GB. By converting the DVD to H.265 MP4, you can get half the size at the same quality.
Please note: Tweaking these settings can shrink your file size, but be careful! Smaller files mean some quality loss. Want to keep DVD quality? Choose MP4 - it keeps the file size around 1.2GB-1.6GB. By converting the DVD to H.265 MP4, you can get half the size at the same quality.
2. To rip DVD with desired subtitle and audio track.
To select the subtitles you like, simply click Subtitles and select the one you prefer. You can also choose preferred audio track from the Audio drop-down lists.
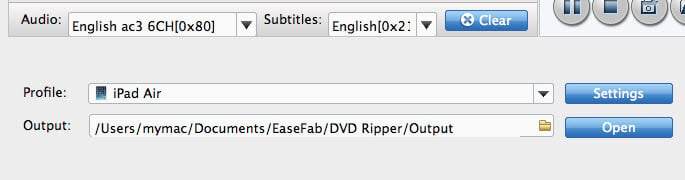
Step 3. Define the output directory and start DVD to iCloud ripping
Optionally, you can click the yellow "Folder" icon at the right of the Output bar to choose any location on your computer disk as the destination to save the output files. After everything is OK, you can hit the big "Convert" button to start ripping the movie to the digital file accepted by your iCloud, iPad, iPhone.
Part 3. How to Upload Ripped DVD Movies to iCloud Drive
iCloud accounts are free to anyone with an Apple ID, which is also free. Create and access an iCloud account on your iPhone, iPad, iPod touch, and Mac computer. If you have a Windows PC, get web-only access to iCloud anywhere you have an internet connection. Below are the steps to upload the ripped movies to iCloud.
1. Log in to your iCloud account with your account name and password.
2. Select the iCloud Drive icon from the icons on the screen.
3. Drag the ripped DVD movie from the desktop to the iCloud Drive window.
You have two options for sharing a file with other people or yourself from iCloud Drive: have iCloud Drive email the link immediately or generate a link you can use whenever you want to share the file with someone or just enjoy it yourself.