Posted by Matthew Watt - Sep 11, 2021 | Contact Author![]()
How to Use VLC to Extract Audio (Snippet) From DVD
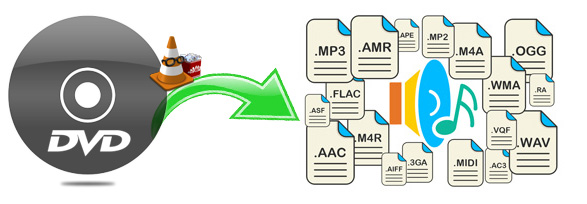
Sometimes, you may need to extract the audio from a DVD. There are many programs out there that can rip audio from DVDs. However, they're expensive and sometimes don't work. Fortunately, VLC, the complete free software program, offers a feature to extract audio from DVD. The steps are simple and it is quite useful when you need the audio part of a DVD. And the process of extracting audio information from DVD is outlined below. Also, you'll find an alternative way to extract just a part of the audio track (audio snippet) from DVD discs.P
PS: This works for all video files, CD, DVDs, Blu-ray that can play on VLC media player; that's almost any multimedia you can play using VLC media player. You can download the media player from the official website if you do not have it installed yet on your Windows or Mac system.
Part 1: How to extract full audio from DVD disc using VLC
Step 1: Open Media Window
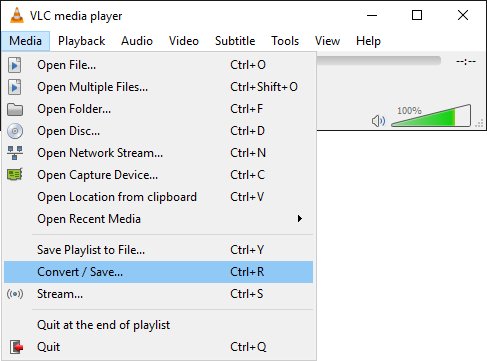
Insert the DVD into your computer's DVD ROM player. Open VLC media player and click on the Media tab. Scroll down and select Convert / Save... to open the Open Media window.
Step 2: Open Convert Window
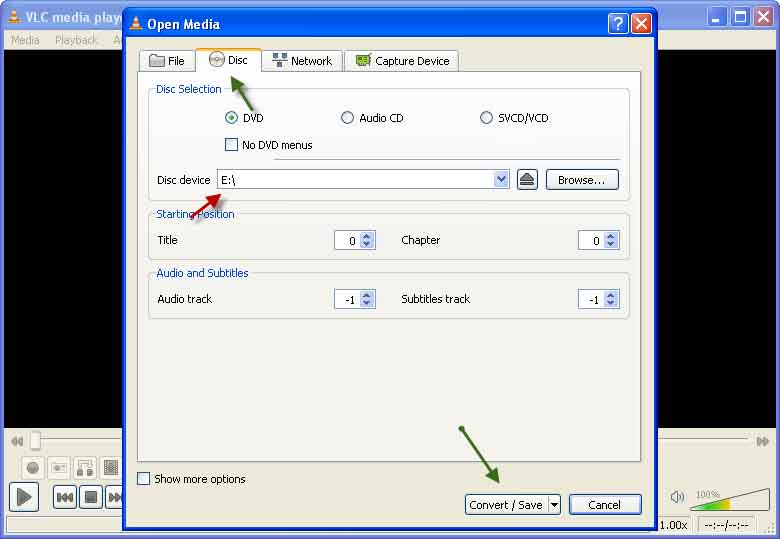
In the Open Media Window, click on the Disc Tab. If you have more than one DVD ROM player/drive make sure the appropriate one, that has the DVD, is selected as the Disc Device. Click on the Convert/Save button to open the Convert window.
Step 3: Choose Output Folder
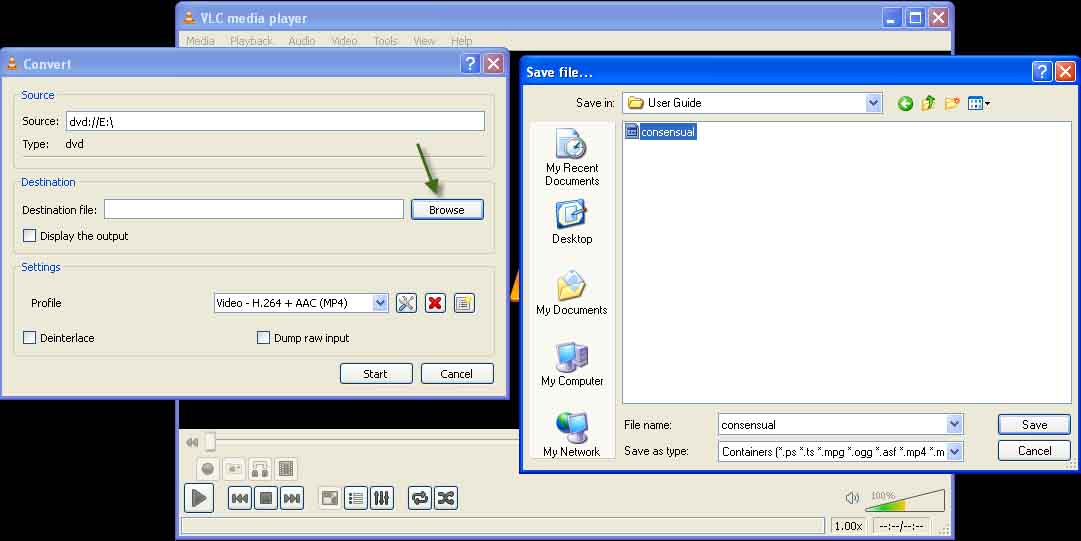
In the Convert window, click on the Browse button to open the Save file window. Choose a destination folder and name for the extracted audio file.
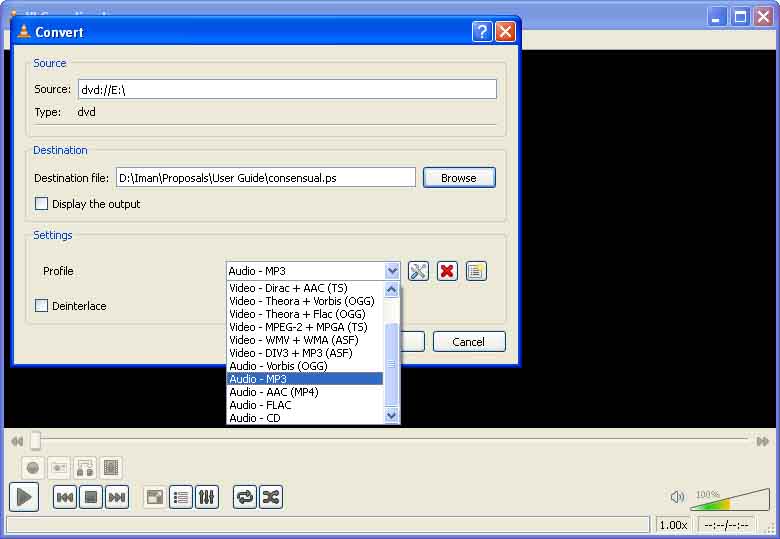
Step 4: Select Audio Format
The Convert window is also where changes can be made to the output settings. In the Profile drop down box, select Audio - MP3.
Step 5: Adjust Advanced Settings (Optional)
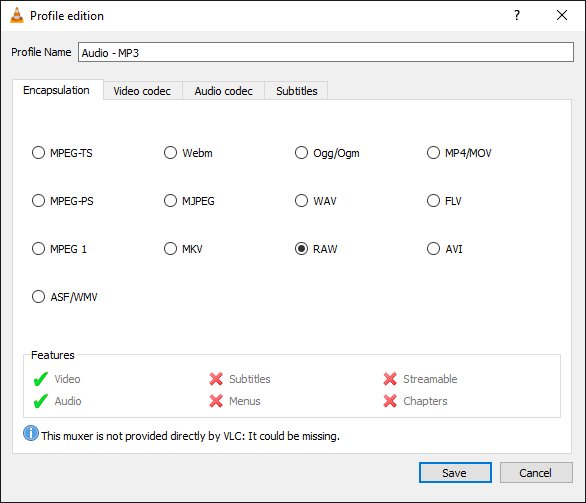
This profile needs to be changed slightly. To the right of the 'Profile' drop down box, click on the spanner and screwdriver icon which will open the Profile edition window on the Encapsulation tab. Select RAW and then click the Audio codec tab.
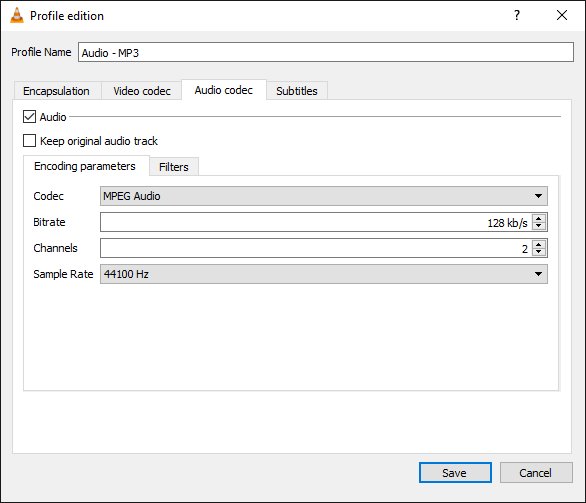
In the Codec drop down box select MPEG Audio. While here, you can also change the Bitrate. The default is 128 kb/s but you may want to increase this for better quality. Click Save. From now on the Audio - MP3 profile will remember these settings.
Step 6: Click Start to Begin Extraction
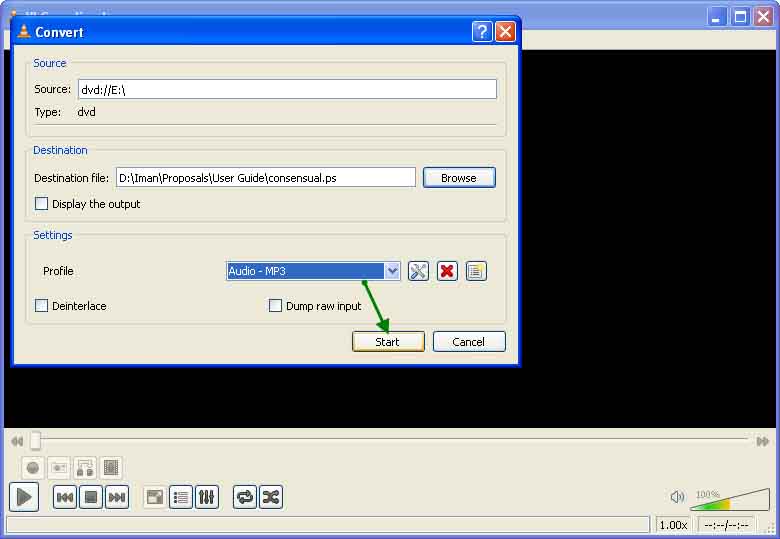
After the above step you will be returned to the 'Convert' window where finally you can click Start to set things in motion. The time it takes to extract the audio varies depending on the file size, but if all goes well, a correctly encoded MP3 file will appear in the destination folder.
Repeat the process for as many DVD discs as you want to convert to audio. Or, more precisely, that you want to extract the audio information from to save them to a new file. You can play the audio file using mp3 players, smartphones, your computer and any other device that supports the selected format.
Part 2: Best VLC alternative to extract audio snippet from DVD
Indeed, VLC Media Player comes with powerful ability to extract audio from DVD, however, it sill has some drawback. For example, the supported output format is limited, you cannot extract only a portion from a DVD disc instead of the whole audio. Plus, VLC Media Player is too complicated for a novice who has little knowledge about video/audio encoding or extracting.
If you are seeking for ease of use, the best video output quality, fastest video conversion speed, and the most video/audio formats supported, EaseFab LosslessCopy will be your best choice. With it, you can extract the whole audio track or just a part of the audio track from DVD in the format you need like AAC, FLAC, MP3, WMA, WAV and more in just a few clicks. Besides, it works smoothly on both Windows and Mac latest system and supports ripping and converting DVD/Blu-ray to over 1000 video/audio formats. You can not only convert, copy DVD/Blu-ray disc but also edit, compress, transfer them easily.
Key Features of EaseFab LosslessCopy:
· Backup BD/DVD to MKV without any quality loss.
· Transcode Blu-ray/DVD to lossless MKV, MP4, MOV files with all multiple audio and subtitle tracks and chapter markers from original BD/DVD.
· Remove unwanted subs streams and audio tracks at will.
· Preserve soundtracks and subs in multiple languages, e.g. English, Spanish, French, Deutsch...
· Support convert/rip/copy latest Blu-ray/DVD movies for Android/iOS/Windows devices.
· Support exporting forced subtitles and .srt/.ass/.ssa external subtitles.
Simple Steps to Extract Audio Snippet from DVD using LosslessCopy
To extract a section only instead of full-length audio, you need use LosslessCopy's Trim function. This is a very basic but pretty helpful editing feature. It is very simple to extract partial length of sound track from videos.
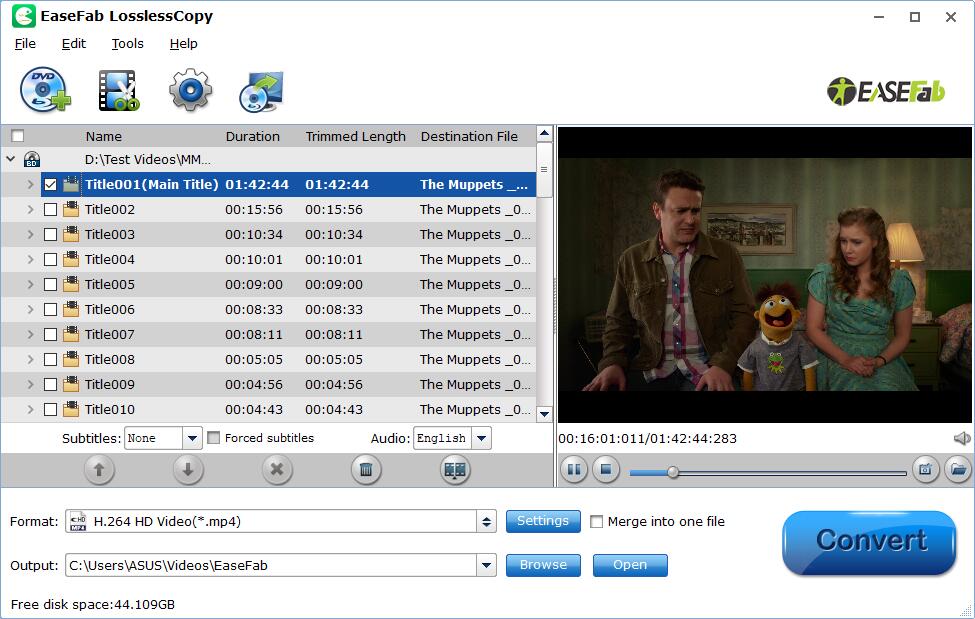
Step 1: Load Blu-ray movies
Insert the DVD disc to the DVD drive and then click the Load Disc button to have DVD movies uploaded to EaseFab LosslessCopy. You can also import Blu-ray files, BD/DVD ISO files, IFO files or Blu-ray/DVD folder for conversion.
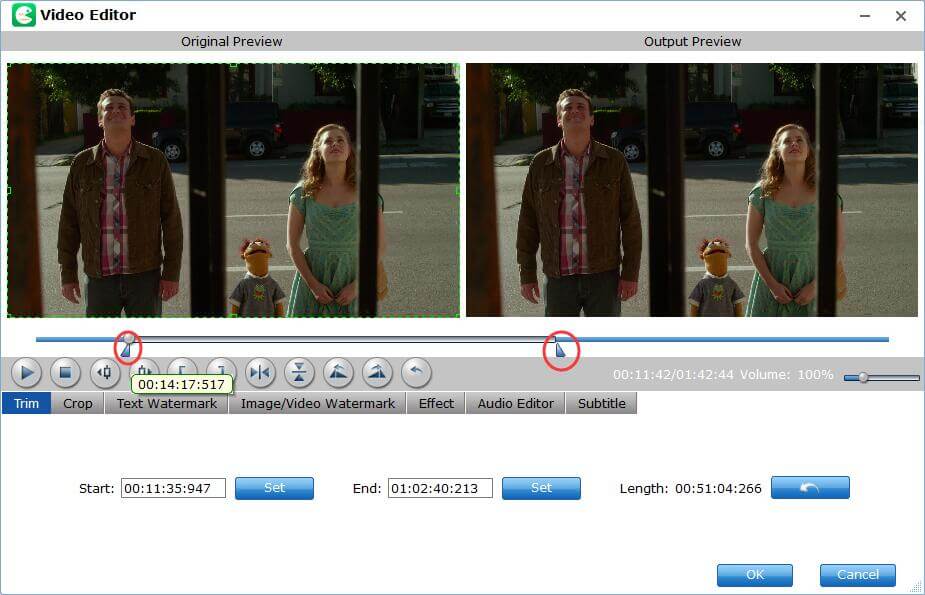
Step 2: Select the portion you want to trim in Video Editor
To use the Trim function in the Editor, simply select the item you wan to trim, click Edit button, then switch to Trim tab, Play the video while settings start time by directly specifying the Start and End time of the clip you want to extract audio from DVD. Learn more about Trimming >>
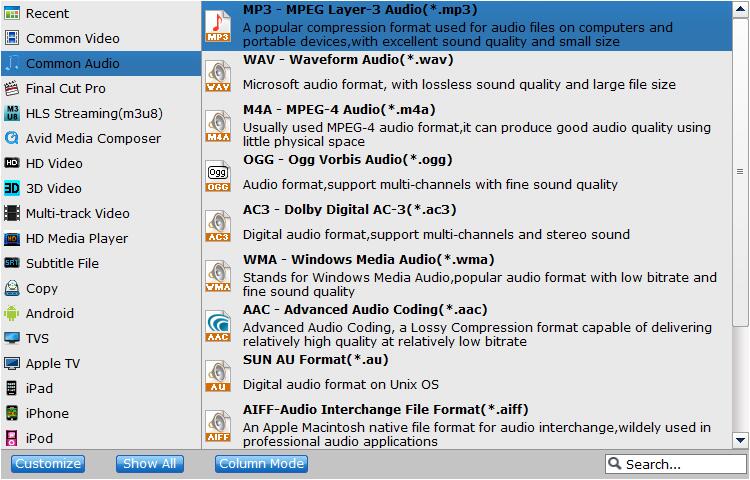
Step 3: Select Audio format
Click on the Format bar and choose Common Audio, here you can find MP3 and various other audio formats (wav, m4a, ogg, ac3, wma, aac, au, aiff, mp2, flac, mka) for you to choose from.
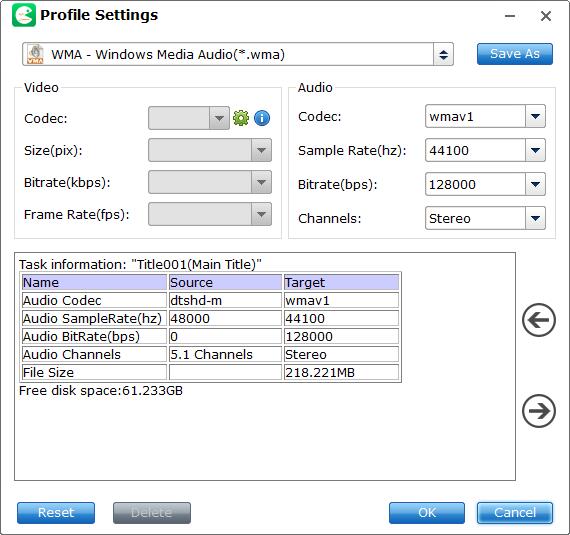
Step 4: Advanced Settings
After selecting the required format, come to the main screen. Click Settings button to enter "Profile Settings" window to change the advanced properties of the audio. Select the bit rate, sample rate, channels. Click on OK once you have selected the modifications you want to do.
Step 5: Rip audio file from DVD
Now that you have selected the titles and done any modifications required through the Advanced Settings section, it is time to extract audio from Blu-ray in an audio file format. But before that, you might want to change the output folder from the default that is mentioned in the Browse section. Click on the folder icon to select a path on your system directories where you want to save the output audio file. Click on the Convert button to start the process of ripping DVD to audio.
Other Useful How-to Guides & Tips
How to Extract and Rip DVD Subtitles to SRT Format
This articles shows you the simple step-by-step guide on how to extract subtitles from DVD to a SRT file format. Read on for details.
How to Rip DVD with the Desired Subtitles
This tutorial shows you an easy way to rip DVD with inner/extra/forced subtitles to AVI, MP4, WMV, MOV, MKV, etc. on PC/Mac.
How to Rip and Stream DVDs via Plex
Here is a simple guide on how to copy and get your DVD collections to Plex Media Server for easily streaming and playback across all your devices without discs.
2 Easy Ways to Add External Subtitles to DVD
This article introduces two easy solutions to add subtitles to DVD movies or videos so that you can better understand the movie plot.
ABOUT THE AUTHOR

Matthew Watt 
Matthew Watt is an amateur tech enthusiast, but now a sought-after editor at EaseFab. He is responsible for writing contents on DVD, digital video, audio, software reviews, new digital contents etc. He continues enjoying painting and comics, and is currently fascinated with photography.
Copyright © 2026 EaseFab Software Corporation. All Rights Reserved.