[2026 Updated] How to Decrypt and Rip DVDs with HandBrake


Summary: Here is a comprehensive guide on how to install libdvdcss and use HandBrake to rip encrypted DVDs (with pictures). Additionally, we'll provide proven solutions to fix the most frustrating HandBrake DVD ripping errors, such as "No valid source or titles found" and "can't rip the entire DVD", ensuring you get a perfect rip every time.
HandBrake is a popular, cross-platform, and open-source freeware primarily known for video and DVD conversion. As for DVD converting, it only accepts personal or unprotected DVDs, and lets you convert them to MP4 and MKV in HD 720P, 480P, and 576P. However, that doesn't mean we cannot rip protected DVDs with HandBrake. When paired with the libdvdcss library, HandBrake can also decrypt and rip CSS-protected DVDs on Windows and Mac.
In this guide, we will walk you through the detailed guide on how to rip DVD with HandBrake, including how to adjust quality settings and install libdvdcss to help HandBrake cope with copy-protected DVDs. Additionally, we'll show you how to address common DVD ripping issues in HandBrake.
Libdvdcss only supports decrypting DVDs protected by the CSS encryption system. It won't solve the "HandBrake won't work" problems for all types of DVDs. The best way to fix them could be trying a HandBrake alternative like EaseFab DVD Ripper, capable of processing various encryption schemes, including general CSS mechanism, Sony ARccOS, UOPs, APS, RCE and Disney X-project DRM.
Table of Contents
- Part 1. Detailed Steps on How to Rip Protected DVD using HandBrake
- Step 1. Prerequisite: Install HandBrake and libdvdcss
- Step 2. Launch HandBrake and load the DVD
- Step 3. Choose the DVD title and chapter you want to rip
- Step 4. Select an output preset
- Step 5. Customize the ripped DVD video (Optional)
- Step 6. Specify the destination
- Step 7. Start DVD ripping
- Part 2. Solutions to fix Common DVD Ripping Errors in HandBrake
- Part 3. Best HandBrake Alternative for DVD Ripping
- Part 4. Conclusion
Part 1. Detailed Steps on How to Rip Protected DVD using HandBrake
Step 1. Prerequisite: Install HandBrake and libdvdcss
1. Donwnload and install HandBrake.
Go to HandBrake.fr download center - the only official place to download HandBrake - to get a copy fit for your computer and install it following wizard. The current version 1.10.2 is available for Windows (10 and later), Mac (macOS High Sierra 10.13 and later) and Linux.
2. Install libdvdcss to your device.
Without libdvdcss, HandBrake cannot rip DVDs encrypted with CSS. To handle the DRM protections on DVDs, you need to manually download libdvdcss for Handbrake. Here are the steps to install libdvdcss for Handbrake on Windows and Mac (manually & via Homebrew) to rip protected DVDs.
Note: Libdvdcss only supports decrypting DVDs protected by the CSS encryption system. Sometimes, Libdvdcss Handbrake/VLC may handle region codes. It won't solve the "HandBrake won't work" problems for all types of DVDs.
How to download and install libdvdcss-2.dll for Handbrake on Windows?
Libdvdcss is part of the VideoLAN project. The latest version of libdvdcss is 1.4.3, and users can download and install libdvdcss-2.dll on Windows 11/10/Mac from VideoLAN official site: https://download.videolan.org/pub/libdvdcss/
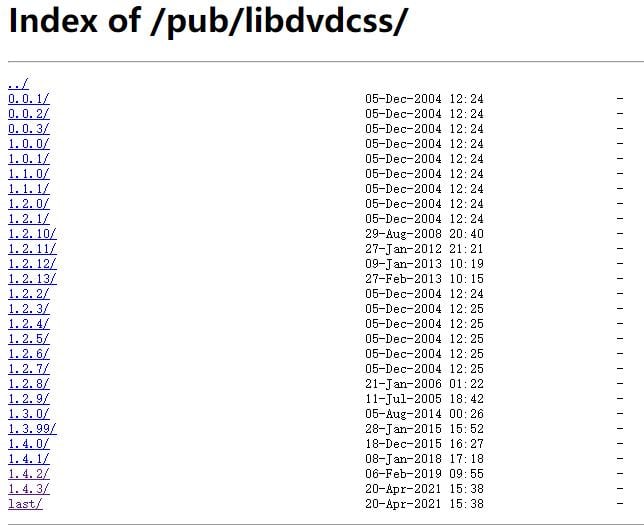
Step 1. Download libdvdcss-2.dll for Handbrake on Windows (11/10/7)
libdvdcss.dll for Windows 32 bit | libdvdcss.dll for Windows 64 bit
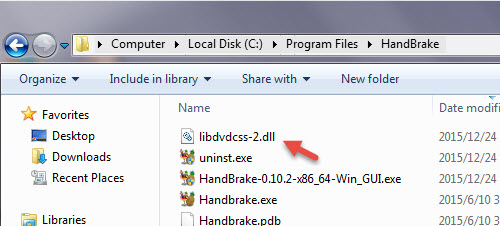
Step 2. You will get a file named libdvdcss-2.dll. You don't have to rename libdvdcss-2.dll as libdvdcss.dll. Just cut and paste the downloaded libdvdcss 2 file into your HandBrake program folder. If you didn't manually set the installation path before, it normally is "C:\Program Files\HandBrake".
Step 3. And that's all for installing HandBrake libdvdcss on Windows (11/10/7). When you open a protected DVD next time, libdvdcss-2.dll will work with Handbrake automatically to remove the copy protection and load the correct DVD data.
Additional Tips:
- Make sure to use the correct 32-bit or 64-bit version of libdvdcss matching your HandBrake installation.
- Copying files into the "Program Files" folder may require administrator rights, run your file manager as administrator if needed.
- You usually don't need to rename libdvdcss-2.dll to libdvdcss.dll, but if HandBrake doesn't recognize it, you can try renaming it.
- If you use a custom installation path or Microsoft Store version of HandBrake, paste the DLL accordingly in the respective program folder.
How to download install libdvdcss HandBrake on Mac via Homebrew
Manually installing libdvdcss for Handbrake on Mac is much complicated than that on Windows, but there is a simple and fast way - via Homebrew. So here we mainly introduce how to download and install libdvdcss.pkg for Handbrake on macOS 15 Sequoia, macOS 14 Sonoma, macOS 13 Ventura, macOS 12 Monterey, macOS 11 Big Sur, and earlier using Homebrew:
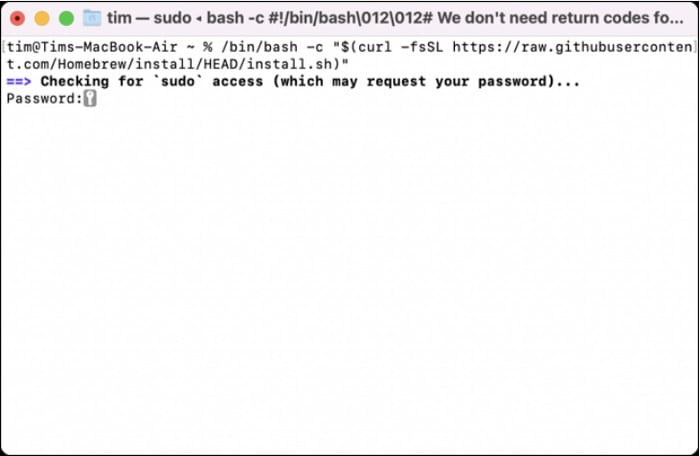
Step 1. First, you will need to install Homebrew on Mac. Click the Launchpad icon in the Dock, type Terminal in the search field, then click and open the Terminal app. In the Terminal app, type the following command and hit Enter to start the Homebrew installation process:
/bin/bash -c "$(curl -fsSL https://raw.githubusercontent.com/Homebrew/install/HEAD/install.sh)" "
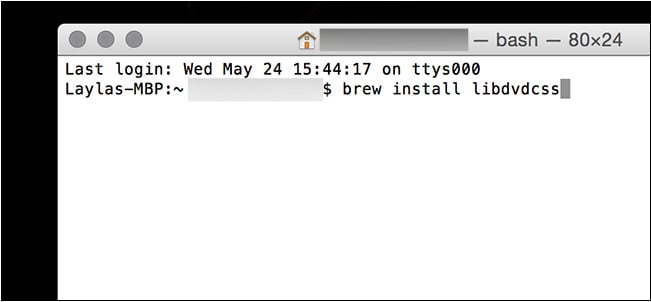
Step 2. After Homebrew is installed, type brew install libdvdcss in Homebrew and hit Enter. Homebrew will automatically install libdvdcss.2.dylib on Mac for Handbrake.
Note: You can also use Homebrew to install libdvdcss on M1/M2 Apple Silicon machines. But you need to note that Homebrew on M1/M2 and some newer Macs will store files in the /opt/homebrew/ folder instead of the /usr/local/ folder. However, if the libdvdcss.2.dylib is installed in the /opt/homebrew/ folder, Handbrake is unable to find and use it. So you will need to manually copy the file into the /usr/local/ folder.
In the following part, we will show how to rip a DVD with HandBrake on a Windows 10 PC, but the principle is the same for other systems.
Step 2. Launch HandBrake and load the DVD
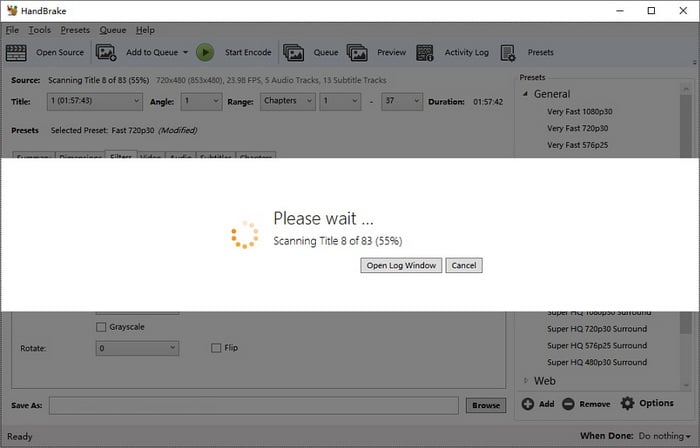
Insert the DVD into the DVD drive on your computer. Open Handbrake and choose your DVD drive from the sidebar that appears. Handbrake will take a moment to scan the titles on your DVD. Wait until this process is finished. It should only take a moment. If libdvdcss wasn't installed incorrectly, you'll see an error saying that the disc can't be read here instead.
Step 3. Choose the DVD title and chapter you want to rip
DVDs often contain multiple titles, such as the main feature, bonus materials, episodes, etc. HandBrake will automatically select what it thinks is the main title, typically the longest one. You can verify this in the Title dropdown at the top.
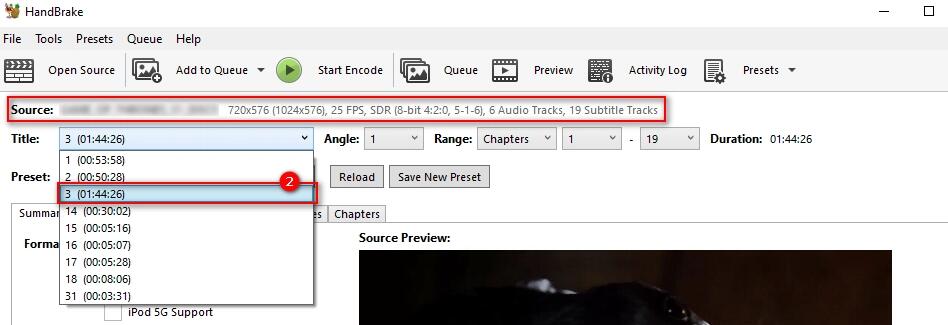
By default, all chapters of the selected title will be ripped. If you only need a specific portion of a title, say you want a particular scene or segment, you can adjust the "Range: Chapters" setting or select a custom start and end time.
HandBrake also supports batch ripping. If you have multiple titles to rip, such as a DVD set of episodes, you can use the "Add to Queue" button after setting up each title. This way, HandBrake will process them one after another automatically when you start the queue.
Step 4. Select an output preset
Besides converting DVD to digital formats in MP4, MKV and WebM, HandBrake also offers lots of output presets, grouped under General (1080p, 720p, 576p, 480p), Web (Gmail, YouTube, Vimeo, Discord), Devices (Android, Apple, Chromecast, Playstation, Amazon Fire, Roku, Xbox), Matroska (H.264, H.265, VP8, VP9), and Production. You can choose any one at will, or add personalized preset by clicking Save New Preset.
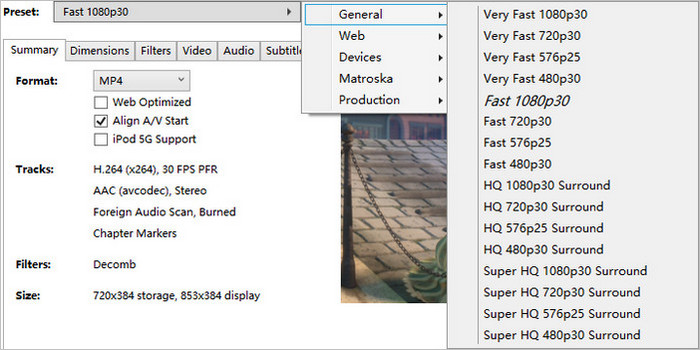
For DVD ripping, don't choose 720p and 1080p presets. The Fast 480p30 for NTSC or Fast 576p25 for PAL presets are ideal for standard-definition DVDs. Choosing a larger preset won't make the output look better but bigger.
One more thing, "Fast" and "Very Fast" presets will sacrifice some output quality, while "HQ" and "Super HQ" presets will slow the DVD ripping speed and increase output file size.
Step 5. Customize the ripped DVD video (Optional)
HandBrake allows you to select subtitle, specify audio track, tweak video parameters like codec and framerate, set quality, and do so much more. But if you know little about those features, just keep the default settings untouched. If you do want to further customize the ripped DVD video, here are some settings you might want to check or adjust before ripping.
Video Settings
Your HandBrake settings like bit rate (most important), resolution, frame rate, MP4 codec, etc. The setting of the number of video bit rates directly determiness your output video quality, while video bitrate is determined by both image resolution and frame rate. The higher the resolution (pixels) is, the more vivid the image will be.
Frame rate affects the smoothness of a video. High quality sometimes also means no stuttering. Your display devices should most likely be included as well, because a 480p video may be high definition on a mobile phone but not even clear on a 4K TV.
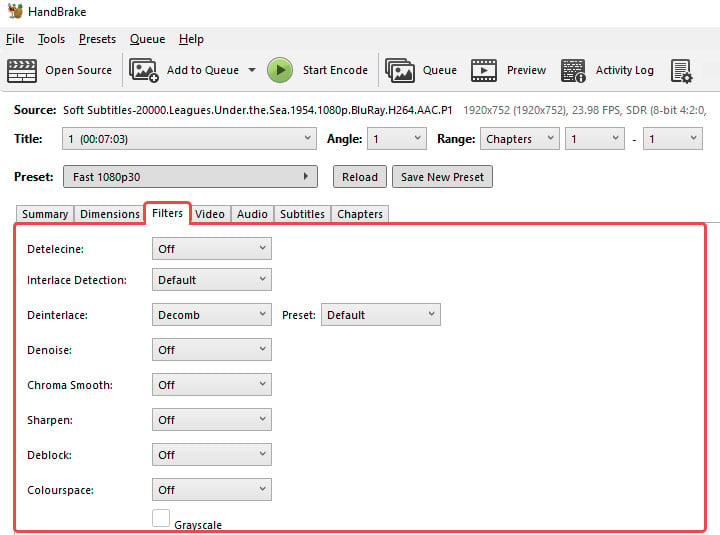
Filters (Deinterlace/Decomb)
Many DVDs, especially older ones or TV recordings, are interlaced. You might notice comb-like lines (interlacing artifacts) in motion scenes if interlacing isn't handled.
By default, HandBrake's presets usually enable a Decomb filter to automatically clean up interlacing when needed. If you know your source is interlaced and want to be safe, you can enable the Deinterlace filter or leave Decomb on. You can also set Detelecine (for telecined sources), but for most DVD content, the default auto settings are fine.
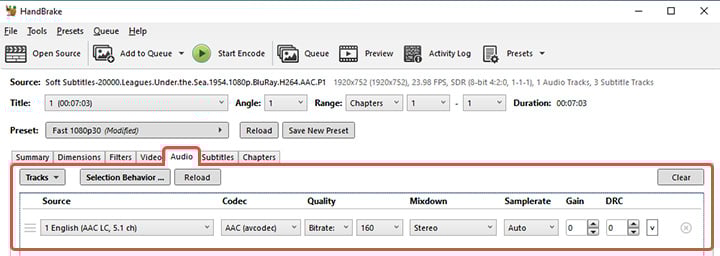
Audio Tracks
The Audio tab offers options of the available tracks on the DVD, and you can pick which to include and in what format.
- Check all audio tracks in Tracks > Add All Remaining Tracks
- Delete any unwanted audio track using X
- Choose an output audio codec with the Codec option
- Set bitrate, quality, samplerate, and gain
- Retain surround sound or mix it down to stereo
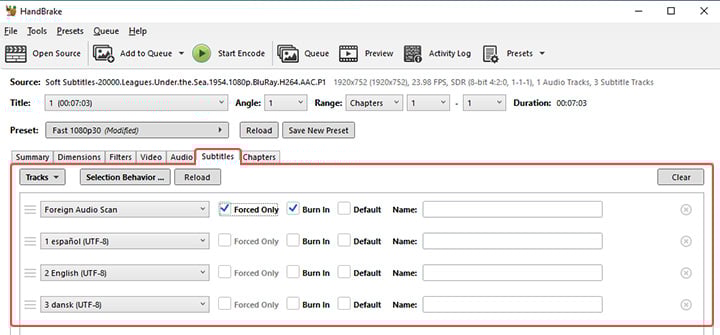
Subtitle Tracks
If you want to set subtitles, go to the Subtitles tab. Here's what you can do:
- Add All Remaining Tracks to see all subtitles
- Drag to set the order of multiple tracks
- Check Burned In to ensure that subtitle track always show
- Import an external subtitle file if you have one
- Let HandBrake attempt to scan for Closed Captions/Subtitle tracks on the DVD
Step 6. Specify the destination
Navigate to Save As section and then click Browse to choose the location for storing the resulting file. HandBrake allows you to rip DVD to computer hard drive or external storage devices.

Step 7. Start DVD ripping
Under "Save Us", click "Browse" to pick where you want to place the movie after you've ripped it. Once everyting is done, you can click "Start Encode" at the top of the window. Then, grab a snack.
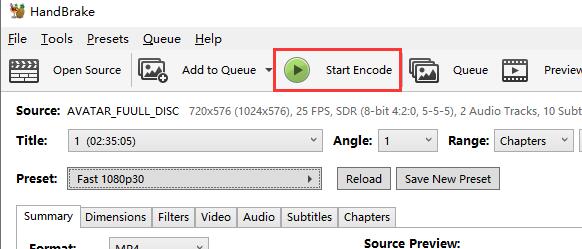
You'll see a progress bar at the bottom showing the status, including percentage done, elapsed time, and estimated time remaining. DVD encodes can take some time, depending on your computer's speed and the chosen settings.

Part 2. Solutions to fix Common DVD Ripping Errors in HandBrake
According to our tests and users' feedback on various forums, there are some common errors during the DVD ripping with Handbrake. Let's see how to fix them.
1. HandBrake only rip part of a DVD
If you have some DVDs that can not use Handbrake to get it 100% converted, then the DVD is most likely encrypted with DVD copy protections. Or the scratches or damage on the DVD can prevent Handbrake from reading certain parts, resulting in a partial rip.
For copy protection, you can download and install the libdvdcss library (with VLC on Mac). This can help Handbrake decrypt some DVDs, but it may not work for all encryption types. If libdvdcss fails, explore alternative tools that can handle stronger encryption.
For corrupted DVD, you can remove dust or debris from your DVD with a soft, lint-free cloth. Or you can try to rip DVDs with EaseFab DVD Ripper which may work with damaged DVDs.
Problems with your DVD drive might cause Handbrake to stop ripping midway. You can try testing your DVD on another computer. If Handbrake rips the DVD fully on another computer, your DVD drive might be faulty and needs repair.
2. Handbrake won't rip DVD
Even with libdvdcss being installed, HandBrake can rip CSS-encrypted DVDs only. Many newer DVDs use stronger DRM, HandBrake will either error out or produce faulty rips.
If you have a problematic DVD, you'll need to use a dedicated DVD ripping software that handles copy protection as a first step. Some popular options include MakeMKV and EaseFab DVD Ripper. Essentially, HandBrake is not a one-stop solution for heavily-protected discs.
3. No valid source or titles found
This error pops up after you attempt to open the source of DVD and it's a common error. The most likely cause is the DVD is encrypted and HandBrake doesn't have access to libdvdcss or the encryption is beyond libdvdcss's capability.
To solve this, first you'll want to ensure that libdvdcss is correctly installed. If you already did that and still see the error, the DVD might have a protection scheme that libdvdcss can't handle. In this case, consider using an alternative DVD ripper like EaseFab DVD Ripper or MakeMKV.
For details, check our guide How to Fix HandBrake "No Valid Source or Titles Found" Error.
4. The ripped video is distorted or jerky
If the ripped video plays but has issues like severe artifacts, blocky or scrambled image, or choppy playback, chances are you are using incorrect settings.
Ensure you use appropriate presets (stick to 480p/576p for DVDs) and set the framerate to the Same as source. Do not manually change the aspect ratio or pixel aspect ratio unless you know what you are doing.
Part 3. Best HandBrake Alternative for DVD Ripping
Handbrake is a good helper to assist people in ripping DVDs and converting videos. However, HandBrake struggles with common copy protection methods unless you install extra libraries, and even then, it may fail with certain discs. If you've fed up with Handbrake, you can try a more powerful and easier HandBrake alternative like EaseFab DVD Ripper. It constantly updates with all kinds of latest DVD copy protections.
- Work with any type of DVDs requiring no third party help, including homemade & commercial DVDs, damaged DVDs, 99-title DVDs, unplayable discs, DVD with bad sector, region code DVD, workout DVD and more.
- Rip protected DVDs to MP4, MPEG, MOV, WMV, iPhone, Apple TV, Android, PSP, Xbox, etc. (handbrake can't do) and 500+ profiles.
- 1:1 backup DVD to ISO image and copy DVD with full/main title without quality loss. (Handbrake has no backup mode)
- Rip DVDs 5x faster than Handbrake with support for Nvidia/AMD/Intel GPU acceleration.
How to rip DVD with this best HandBrake alternative
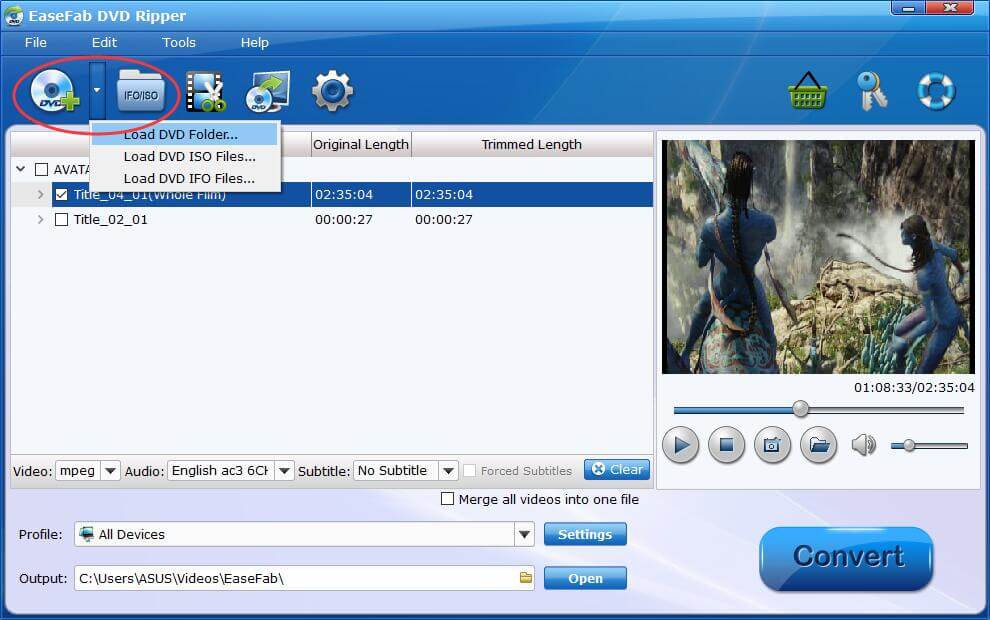
Step 1. Load DVD movies
Insert the DVD disc into your computer's hard disk and launch EaseFab DVD Ripper. Then click "Load DVD" to add the DVD files. As you can see, you can select the titles you want to rip and merge them into one big file. At the bottom, you can select your desired subtitle and audio track.
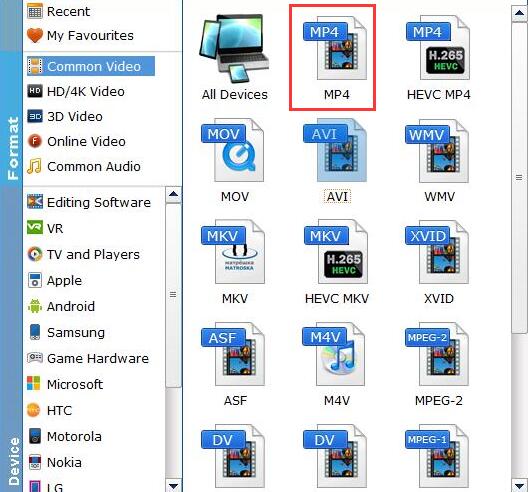
Step 2. Select output format
Then click "Profile" and select the format you prefer. you can see all popular formats devices divided into various categories.
Step 3. Start ripping
The last step is to click Convert button to being ripping your DVD to digital videos. When the conversion finishes, click Open to get the ripped videos and enjoy them anywhere you like.
Part 4. Conclusion
HandBrake is suitable for those with limited budgets for DVD ripping. It is a good choice for digitizing non-protected DVDs. And you can empower HandBrake to handle the majority of standard CSS-encrypted DVDs by installing the libdvdcss library.
If you're looking for a reliable, flexible tool that works with nearly any disc—including copy-protected ones—EaseFab DVD Ripper offers a strong balance of usability, format support, and speed. It's especially useful for those with a large collection to convert.