If you have collected some vivid FLV files, you may have the need to edit the FLV files in Adobe Premiere Pro before sharing with others. However, when you're trying to import FLV videos to Premiere Pro, you may come across this problem: The file has an unsupported compression type. Actually, Adobe Premiere Pro (including the latest Premiere Pro 7.1) does not support importing FLV files directly. To do that, you need to convert FLV to Adobe Premiere Pro fully-compatible formats, such as MPEG-2. After that, you're able to edit FLV in Premiere Pro CC, CS6, CS5.5, CS5 or CS4 successfully.
To transcode FLV for Adobe Prmeiere, here I would like to introduce you to an user-friendly and professional video converter app - EaseFab Video Converter for Mac. It can help you to figure out this kind of problem effortlessly and keep the original quality of the video. No matter what version you have for Adobe Premiere Pro, you're able to easily to convert FLV files to edit in Premiere Pro smoothly. If you're using a Windows PC, please turn to EaseFab Video Converter, which can help you finish the FLV to Premiere conversion in Windows 8.1/8/7/Vista/XP. Download just download, install and run the program, then follow the step-by-step guide below.
Free download the FLV to Premiere Converter trial version:
How to convert and import FLV to Adobe Premiere for editing
Step 1. Load FLV files
Go to your local folder where you have saved your FLV files. Directly drag and drop the FLV files to the program. Batch conversion is supported so that you can add all the FLV files you want to the program fro multiple conversion.
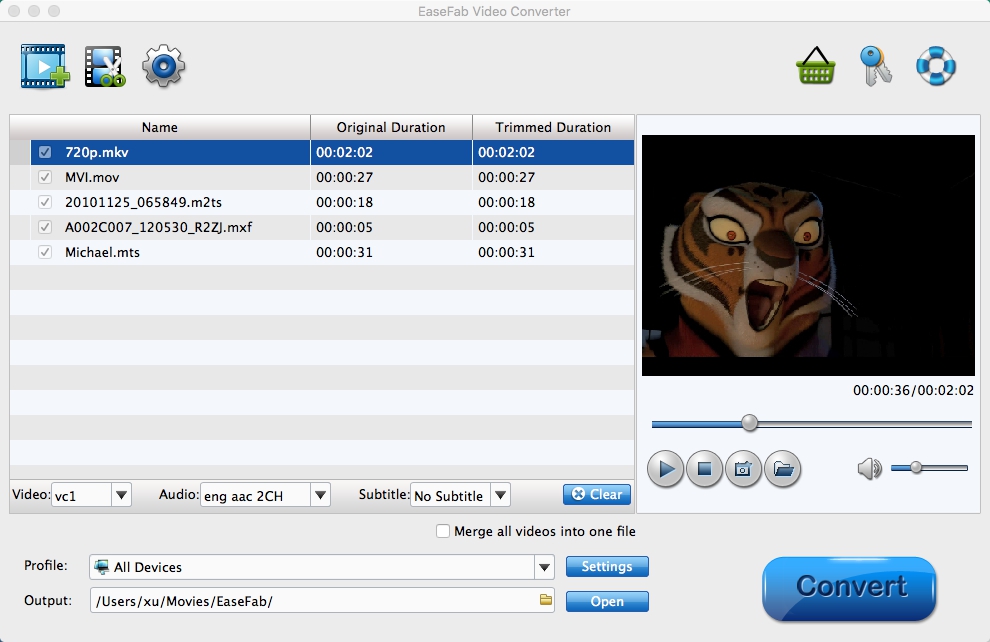
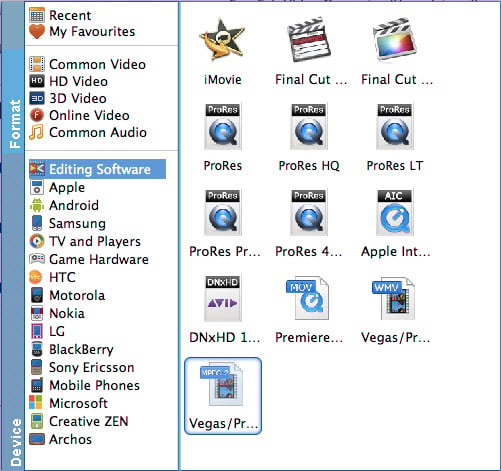
Step 2. Choose output format for Adobe Premiere
This FLV to Premiere converter provides three optimized presets for Adobe Premiere. You can select MOV (Entitled Premiere), WMV or MPEG-2 from "Editing Software" as the output format. All output videos will keep the original quality of MOV video and seamlessly fit Adobe Premiere Pro CC, CS6, CS5.5, CS5, CS4 and more. Here we recommend you choose MPEG-2.
Tip: The default setting works well. Of course, if you want to customize video and audio encoding settings, just click the "Settings" button to customize these settings. You can adjust the output video/audio resolution, frame rate, bit rate, etc. to customize the output files to get the best quality you want.
Step 3. Start converting FLV to MPEG-2 for Premiere
Finally, hit the "Convert" button at the bottom-right corner of this app to convert FLV to Adobe Premiere supported formats. A while minute later, the conversion will be finished. And at the moment, you can find the converted files in its output folder. Then, import the output files to your Adobe Premiere for video editing.