
Adobe Premiere Pro is a powerful and useful video editing software for both professional and novice video editors. Dozens of great video editing features are offered. Premiere Pro can import many video and audio formats. It can import files in the formats listed here, provided the codec used to generate a specific file is installed locally. Most of these software modules are installed automatically with Premiere Pro. Here we mainly discuss how to import videos into Premiere Pro.
There are two main ways to import media into Premiere, the import command and the media browser. They do things slightly differently and have uses they are both best suited to, here we will look at the process itself and which method to use in a given situation.
Method 1: Import files with the Import commands
Note: While you can import clips directly from file-based media connected to your computer, it is best to first transfer clips from these media to a hard disk. Then, import them from the hard disk.

* Choose File > Import. You can select multiple files.
* To import a recently imported file, choose File > Import Recent File > [filename]. (The filename doesn't appear if Premiere Pro preferences have been reset.)
* To import a folder of files, choose File > Import. Locate and select the folder, and then click Import Folder. The folder, with its contents, is added as a new bin in the Project panel.
* For instructions on importing a numbered still-image sequence as a clip, see Importing numbered still-image sequences as one clip.
This method of importing is best suited to self-contained media such as audio or graphics, or video files such as MP4 that are single files themselves, whose location on your computer you know so you can navigate to them easily. This is not the way to import videos from cameras, as they invariably create complex file and folder arrangements that make choosing the correct files difficult. This is where you would opt for the media browser method instead.
Method 2: Import files with the Media Browser
Whilst on the surface media browser appears to do the same job as the import command the way they carry out the task is somewhat different, media browser is designed to let you see the media created by cameras, and show you easy to understand icons and metadata rather than the intricate pattern of files and folders they use. This makes picking the correct clip from a selection much easier, with metadata showing you date and duration as well as file type.
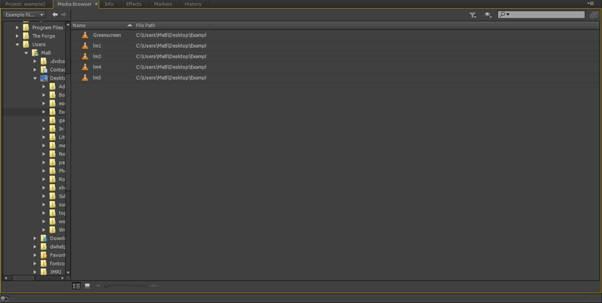
The media browser panel is found in the project panel, which on the standard layout is the bottom left corner, and can also be accessed by the Shift+8 shortcut. As you can see from the screenshot it works like an operating system file browser and allows you to navigate through the file directories of hard drives and removable media connected to the system.
One of the benefits of media browser is to narrow down the type of media being shown, so you can set to avchd for instance and it will display just that type of file in a given location. Because many projects use media from different sources this can be a real boon to finding the right file within a list.
1. Select Window > Media Browser.
2. To browse to the desired files, do one of the following:
* To open a folder recently opened, click the triangle in the Recent Directories menu, and select the folder.
* In the list of hard drives and folders in the Media Browser, click the triangles next to folder names to open them.
3. To view only files of certain types, click the triangle in the Files Of Type menu, and select a file type. To select an additional type, open the menu again and make another selection. Repeat until all desired types have been selected.
4. Select one or more files from the list of files. To select more than one non-contiguous file, Ctrl-click (Windows) or Command-click (Mac OS) the filenames. To select more than one contiguous file, Shift-click the filenames.
5. Do one of the following:
* Select File > Import From Browser, or right-click the file in the Media Browser and select Import. Alternatively, you can drag the file from the Media Browser into the Project panel, or drag the file from the Media Browser into a Timeline.
The Media Browser imports the file into the Project panel.
* Right-click the file in the Media Browser and select Open In Source Monitor. Alternatively, double-click the file in the Media Browser to open it in the Source Monitor.
The Media Browser opens the file in the Source Monitor.
File Types
Media browser displays more or less any file there is in a given location, and importing is simply a matter of selecting the correct file and double clicking it or right clicking and selecting import from the menu. You can select multiple files at once by holding down shift and import them all together if needed.
There are some exceptions to this, however, despite having a huge number of file types supported natively within Premiere, you will sometimes run into files that are not supported, FLV and MKV files being the most common ones, but this is not the end of the world and there is a simple solution.
EaseFab Video Converter Ultimate (available for Windows and Mac users) offers an easy way to convert any file you may have into media that Premiere can use quickly and efficiently, and is a great tool to have alongside premiere if you commonly work with multiple file types.
About transferring files
Transferring projects from other computers
When transferring project files, such as After Effects project files, Premiere Pro project files, or Final Cut Pro project files from another computer to the computer on which you import those project files into Premiere Pro, make sure that you transfer all the assets associated with the project files. Keep the project files, and their associated assets, on the destination computer in folders that have names and folder structures identical with files on the computer of their origin.
Transferring assets from file-based media
It is possible to edit assets residing on file-based media, such as P2 cards, XDCAM cartridges, SxS cards, or DVDs. However, Premiere Pro performs faster if you first transfer the assets to a local hard disk. Using Windows File Explorer (Windows) or Finder (Mac OS), transfer files from file-based acquisition media. Then, import the files on the hard disk into Premiere Pro projects.
When transferring files to hard disk from file-based media, transfer the folder containing all related files and its subfolders. Keep the folder structure intact. For example, when transferring files from AVCHD file-based media, transfer the BDMV folder and all its contents. When transferring files from DVCPRO HD media, transfer the CONTENTS folder and all its contents. When transferring files from XDCAM EX media, transfer the BPAV folder and all its contents. When transferring files from DVD, transfer all the contents of the VIDEO_TS folder, and if it exists, all the contents of the AUDIO_TS folder.
Transfer video files from file-based media into the same folder you specify for captured video with the project scratch disk settings.
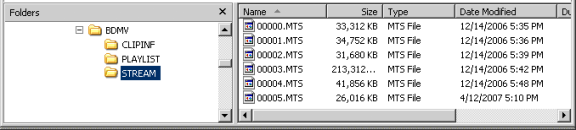
The folder structure for AVCHD assets
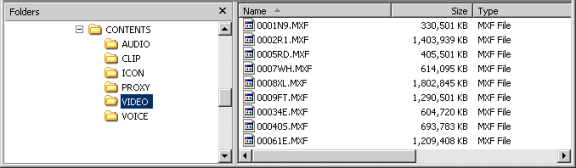
The folder structure for DVCPRO HD assets
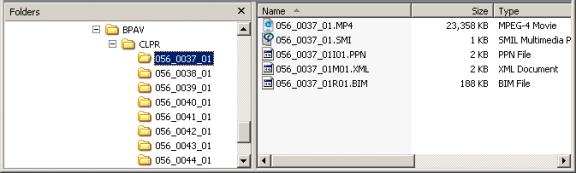
The folder structure for XDCAM EX assets
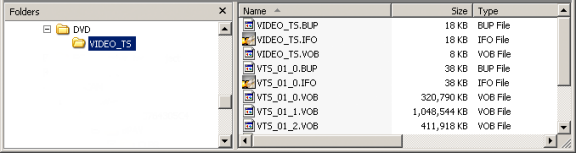
The folder structure for DVD-video assets