How to Fix MP4 File Import Failure in Adobe Premiere Pro


As the most widely used video format, MP4 is accepted by almost all mobile devices, media players, video hosting sites, and video editing software, including Adobe Premiere Pro. It's easy to import an MP4 file into Premiere Pro, you just need to create a new project, then drag and drop the MP4 from your file explorer or finder into the project panel. However, sometimes you may find it a painful experience to import MP4 video to Premiere Pro (2025 included) and you may encounter file import failure issues like these:
"Importing MP4 Into Premiere pro CC - I was just wondering, I have footage in a strange format; .mp4, and it wont import into Premiere. Someone asked me if I had all the updates, etc, I do, and still no luck with it... Before I try the reinstall, I was just wondering if anything else can be done about the format."
"This problem happened before and I can't remember how to fix it. I imported an .mp4 file and the file is purple, with no audio playing when I drag it into my timeline, but it plays in Windows Media Player just fine. Everything was fine yesterday but today it's doing this all of a sudden. I tried using the media browser to import. I tried uninstalling and reinstalling Adobe CC. Nothing is working but I've had this problem before and fixed it. I just don't remember how."
Actually, there are various reasons why your Premiere Pro won't import MP4 file. In this article, we will take you on a tour of exploring the potential causes and fixing the mp4 file import failure in Adobe Premiere Pro with proper solutions.
Table of Contents
- Why You Can't Import MP4 File into Premiere Pro?
- How to Fix MP4 File Import Failure in Premiere Pro?
- Solution 1. Manually delete all media cache
- Solution 2. Restart program and change settings
- Solution 3. Update Premiere Pro or Graphics Drive
- Solution 4. Transcode MP4 to Premiere Pro Compatible Format
- FAQs
Why You Can't Import MP4 File into Premiere Pro?
The MP4 file import failure error can be caused by a variety of reasons. First of all, let's make it clear why you have trouble importing MP4 files to Premiere Pro.
1. Caused by media cache files
Media cache files are temporary files that store information about the media assets utilized in your projects. Deleting the media cache files can fix 60% of the MP4 file import failure issues in Premiere Pro, including Premiere Pro not importing the audio of MP4 file.
2. Caused by corrupted MP4 file
You can check whether the MP4 file is corrupted by playing it on a video player. If it plays successfully, then your MP4 file is not corrupted. If Adobe Premiere Pro is able to import other MP4 files without any issues except for the specific one, it's probably that the codec used in your MP4 file might be incompatible with Premiere Pro. In this case, transcoding MP4 file can help easily fix the issue.
3. Caused by old Premiere Pro version or an underpower computer
Maybe your Adobe Premiere Pro version is too old to support HEVC or other newly-supported codec in your MP4 file. Premiere Pro and Media Encoder must both be updated to 12.0.1 or later. Update your Premiere Pro and Media Encoder to the lastest version. An underpower computer can also cause MP4 not importing to Premiere Pro error.
4. Caused by wrong settings in Premiere Pro
If you can import all other files in MOV, AVI, MKV, etc. correctly while all the files with the .mp4 extension can't be imported into Premiere Pro, there might be be settings mistakes in your Premiere Pro. You can fix this by restarting Premiere Pro, computer, changing render or GPU settings in Premiere Pro, or update Premiere Pro or Graphics Drive.
How to Fix MP4 File Import Failure in Premiere Pro
According to the analysis above, you can try the following fixes:
1. Manually delete all media cache
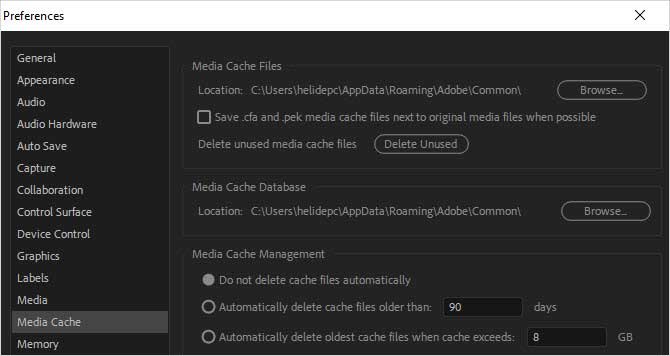
Deleting media cache files can help fix errors, improve performance, and free up disk space by removing temporary files that can become corrupted or take up a lot of storage. Go to Edit > Preferences > Meida Cache, and click Delete Unused to clean those unused media cache files. Then get back to test whether you can load the MP4 to Premiere Pro or not.
2. Restart program and change settings to import MP4 to Premiere Pro
Whatever the error is or you will encounter, take "Restart" always as your first troubleshooting step. It solves the vast majority of the problems of electronic devices.
- Shut down and reopen Premiere Pro. Then create new project and try to import MP4 to Premiere Pro.
- Save your other projects that are open currently, and restart the computer.
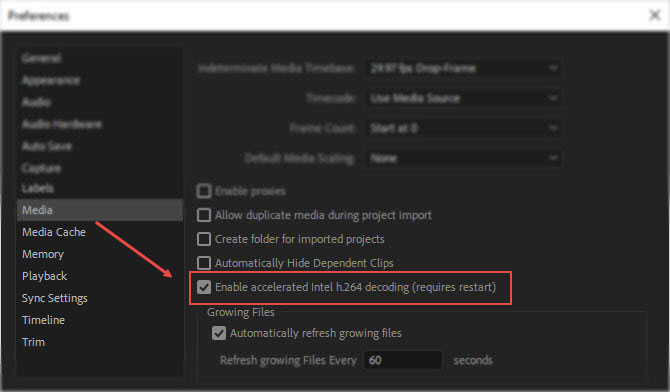
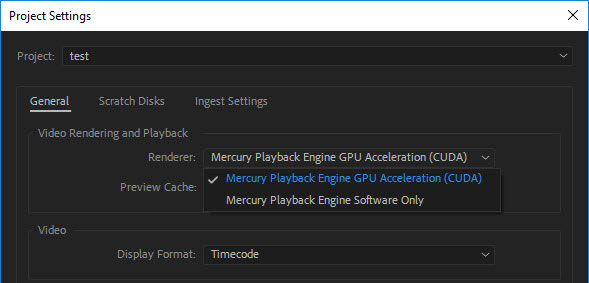
- Turn off and turn on hardware acceleration. Or switch the renderer to Mercury Playback Engine Software Only. Or just uncheck "Enable accelerated Intel h264 decoding".
How to turn off the hardware acceleration support of Premiere Pro?
- Open Adobe Premiere Pro and move to Edit.
- Choose Media under Preferences.
- Uncheck "Enable accelerated Intel h264 decoding (requires restart)" here and then get back to import your MP4 file to Premiere Pro. The computer we use for test here doesn't support Nvidia GPU acceleration. Just Intel QSV.
How to switch to software renderer only?
- Go to File > Project Settings > General.
- Then move to the Video Rendering and Playback section.
- Switch Renderer to Mercury Playback Engine Software Only and see if it can fix your MP4 file import failure in Premiere Pro.
3. Update Premiere Pro or Graphics Drive
Both updates to software and hardware may render potential errors. Follow the below 3 simple tricks to fix Premiere not importing MP4 file issue.
- 1. If you're using an old version of Premiere Pro, update to its latest version to have a try. If you're using a trial version, it's highly recommended to consider purchasing the paid version for USD 239.88 per year. The trial version may have an effect on it sometimes while the paid version typically offers improved stability and functionality, ensuring a smoother video editing experience.
- 2. If Premiere Pro can't load your MP4 file even you are using the latest version, roll back to the old version and try again.
- 3. Adobe Premiere Pro 2025 requires the newest version of graphics drivers. So updating your GPU driver might solve file import failure problem.
4. Ultimate Fix: Transcode MP4 to Premiere Pro Compatible Format (100% Working)
Analysis: If the troubleshooting steps mentioned above won't work, and the MP4 file doesn't have a playback error, it's probably due to the codec used within the MP4 container. While Premiere Pro handles most common MP4s, a less common or proprietary codec might require conversion to a more standard codec like MPEG-2 or H.264 for successful import.
If you have Adobe Media Encoder, you can use it to conduct video conversion. If you don't have that tool or can't manage to convert problematic MP4 files to desired format with Media Encoder, you might as well try an easier-to-use yet more effective video converter and decoder - EaseFab Video Converter. This program can cope with MP4 files with different encoded video/audio streams from any source (including DJI drones/Osmo Action camera, GoPro, iPhone, etc.). And it can convert the codec in MP4 file to Premiere Pro compatible MPEG-2, H.264, DNxHD and ProRes codec.
As for the video quality, don't worry too much. With the constantly updated conversion algorithm and the advanced high quality engine, it guarantees you the output videos with up to 98% quality reserved, wrinkles or freckles in image still clear enough to count. Codec correction (or conversion) is just the tip of the iceberg that it can handle. In terms of the compute-intensive 4K MP4 files, it's also a decent performer, letting you downscale 4K to 1080p, lower 60FPS to 30FPS, adjust bit rate, etc. to better suit your computer hardware configurations and to ensure a smooth MP4 importing and latter editing.
Tutorial: How to Decode MP4 to Premiere Supported Codec/Format?
PS: The step-by-step guide is almost the same on PC and Mac. Here we will take EaseFab Video Converter for Windows as the example.
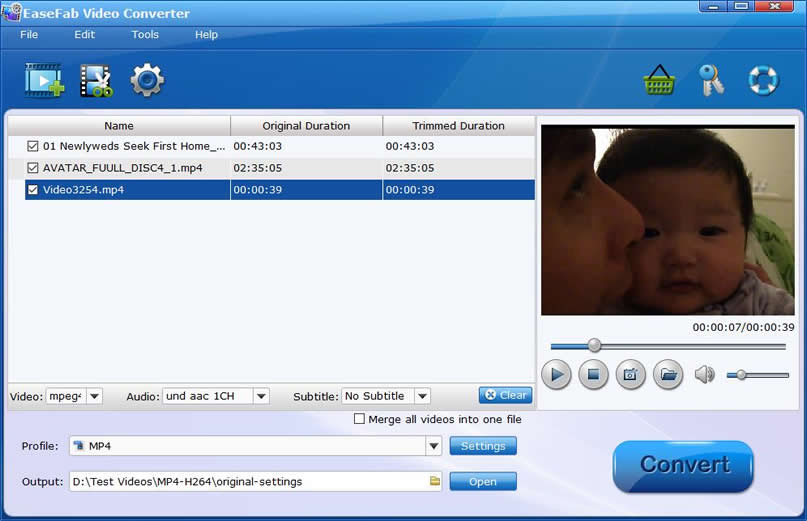
Step 1. Download and launch EaseFab Video Converter on Windows PC or Mac. Click Add Video button to import your MP4 video. Dragging and droppping works too. (Note: batch conversion is supported, so you can several mov videos to the program to convert at a time.)
Step 2. Click Profile pull down list, move mouse cursor to Editing Software and then select MOV (encoded by H.264 codec) or Final Cut Pro X (encoded by ProRes codec) for Adobe Premiere Pro. MPEG-2, WMV are good choices as well.
Note: The H.264 MOV can preserve image quality with the smallest file size. The ProRes can preserve the best image quality and provide better performance when editing in Premiere but ProRes files typically need ten times as much storage of H.264-based files.
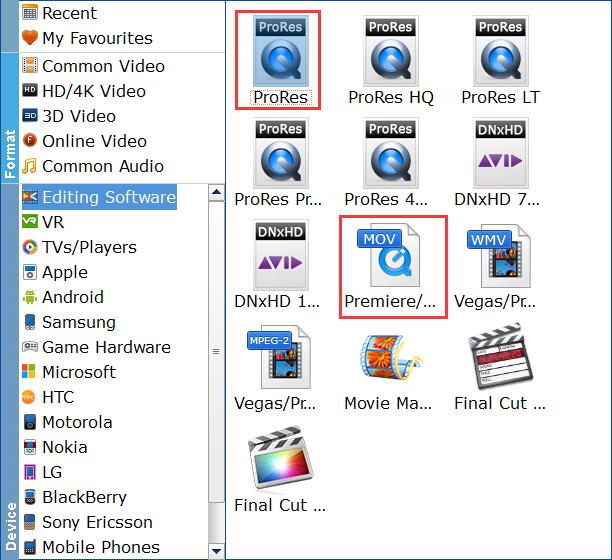
Important Tips: H.264 is really optimized to be a delivery codec while ProRes is optimized to be an editing codec. That said, if you just need to do a simple edit and your PC or Mac has the power to edit H.264 you can get away with it no problem, but if you plan to do a heavy edit with lots of transitions and effects and color grading you will be best served by ProRes.
Step3. Hit Convert and it will begin fast video decoding, conversion and processing your MP4 video at one go.
After the conversion is complete, get the resulted files via clicking the Open button and then you can import the result files to Adobe Premiere Pro CC 2020 or lower version without any trouble.
FAQs about Premiere Pro and MP4
1. Why is Premiere Pro not playing MP4 files?
The major cause that Adobe Premiere Pro CC fails to import MP4 files is that some required codec is missing and the file format is not supported. MP4 is a container format that keeps data encoded with different codecs, like MPEG4, MJPEG, H. 264, HECV, and others. To import successfully, Premiere Pro must be compatible with the specific codec used by your MP4 file.
2. Why is there no audio when I import a MP4 clip in Premiere Pro?
If you get no sound after importing MP4 clip to the timeline, check your Source Patching toggles (A1, V1). If the A1 audio toggle is turned off on the left of your timeline, Premiere will only place the video part of the clip into your sequence.
Cleaning the media caches can fix 60% of the issues. You can go to C:/Users/(username)/AppData/Roaming/Adobe/Common (Windows user), or C:/Users/(username)/Library/Application Support/Adobe/Common (Mac user) to find the media cache file folder, and then delete all files under that path.
3. What to do if I can't import MP4 to Premiere Pro?
But if you find yourself unable to import MP4 into premiere pro, or receive a prompt message that reads 'The MP4 file is not supported in Adobe Premiere Pro', you can refer to the above reasons and the effective solutions above to address it.