
Many modern video cameras output in the avchd format, this creates MTS files that you need to import into Premiere Elements to edit together and work on as you desire. Although it is officially stated that MTS is supported by Premiere Elements, many MTS to Premiere Elements issues still exist there and troubled the users. In fact, there are some clues for users to check if they can not open MTS clips in Adobe Premiere Elements:
1. Start a new project
Try starting a Premiere Elements project and placing one of your AVCHD files at the beginning of your timeline. This will trigger Premiere Elements to automatically download the components for this type of video. Once it has this component, your computer should create the thumbnails for the files. It won't happen immediately - but the Organizer will work in the background to update itself as you do other things.
2. Download latest version of Quicktime, per the program's requirements
3. Adjust the project settings for PAL/NTSC
What if you still cannot ingest MTS files into Adobe Premiere Elements after all efforts?
On this occassion, a best way to avoid any problems and save time is to transcode MTS files to Premiere Elements more editing-friendly format. In fact, the incompatibility of AVCHD .mts files exists among different camcorder manufacturers. Mostly, the MTS footage captured by Sony Handycam is encoded with H.264/AVC codec which does not work well with video editing software except for few ones. Despite of this, H.264 codec is acknowledged as a universal codec for camcorder videos, especially for HD contents. The advanced compression method of H.264 results in much less storage and the same picture quality comparing with MPEG-4. However, the highly-compressed content is not so friendly for editing software.
If you have tried the way above and still have problems when using MTS files in Premiere Elements and want to make a smooth editing, just follow the steps below to convert AVCHD MTS files to Premiere Elements.
Guide of Converting MTS files for Editing in Premiere Elements Smoothly
First of all, download and install the app - EaseFab Video Converter, which can be used as an AVCHD MTS to Premiere Elements Converter. It is free, clean and safe to install and use. With it, you can easily and quickly convert MTS to MPEG-2 encoded MPG files, which ensure maximum editing quality and efficiency when working with Adobe products including Premiere Elements, Premiere Pro, After Effects, etc. If you running a Mac computer, please turn to the equivalent Mac version here. Below are the simple guidelines.
1. Add MTS AVCHD files
Run the MTS to Premiere Elements converter and click the "Add Video" button to import the MTS videos to be converted. The converter supports converting multiple files at a time.
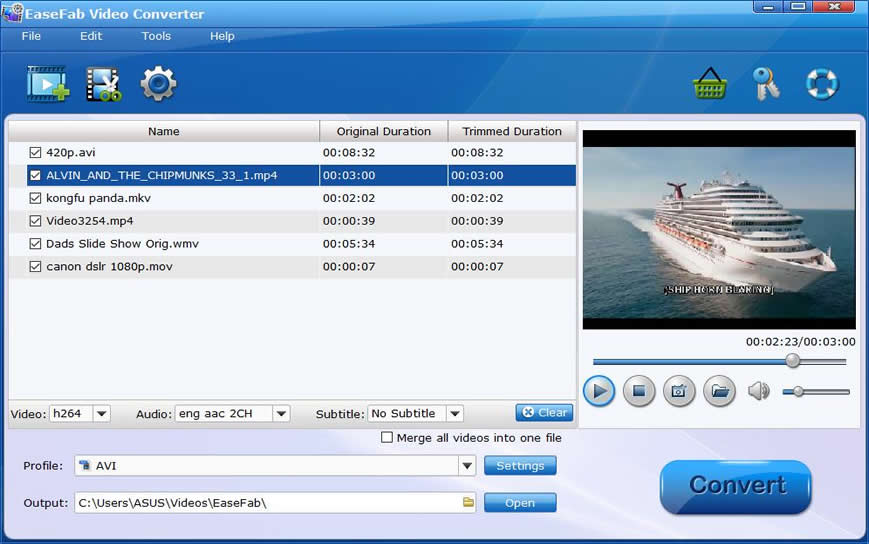
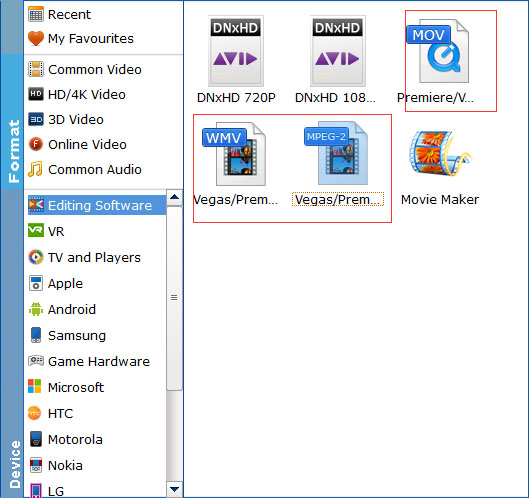
2. Choose the optimized preset for Premiere Elements
The program has three already optimized the video settings for Adobe Premiere Elements. You can select MOV (Entitled Premiere), WMV or MPEG-2 from "Editing Software" as the output format. Here we recommend you choose MPEG-2 which can help you keep the original quality of MTS video and seamlessly fit Adobe Premiere Elements 14/13/12/11/10.
Tips: The default setting works well. Of course, if you want to customize video and audio encoding settings, just click the "Settings" button to customize these settings. You can adjust the output video/audio resolution, frame rate, bit rate, etc. to customize the output files to get the best quality you want.
3. Start Converting Now
Now, you get all things ready. Just click Convert. Then it begins to do the conversion work automatically, you can view the progress bar, and click suspend or quit if necessary. Now, you can easily drag the converted MTS AVCHD file to Adobe Premiere Elements 14/13/12/11/10, and do whatever you wanna do. It could have been so easy, right? Cheers.