Best Way to Convert MP4 to Apple ProRes on Mac and Windows


Summary: Why do most professionals convert MP4 to Apple ProRes Codec? What's so good about ProRes? What is the best way to turn MP4 to ProRes 422, ProRes 4444 on Mac or Windows? All the answers can be found in this article.

The users who want to edit MP4 videos with Final Cut Pro, Adobe Premiere Pro, iMovie, DaVinci Resolve usually run into incompatiblity issues or can't edit them smoothly. Why? This is due to that MP4 videos, which mostly contain the highly compressed H.264 or H.265 codec, are very hard to deal with during video editing. One of the easiest yet efficient solution is to convert MP4 to Apple ProRes codec (sometimes called "intermediate" or "production"codec), which sits in a kind of "sweet spot" between the humongous data rates of uncompressed video, and the egregious processing demands of Long Gop video. Once converted, the editing process will be much simpler and less resource-intensive.
In this article, we will show you how to transcode MP4 to Apple ProRes 422, ProRes 4444 or other ProRes codecs with the most efficient conversion tool. Also you will have a fair idea about the Apple ProRes codecs, when and why you should Apple ProRes over MP4.
Table of Contents
Why We Should use Apple ProRes Instead of MP4?
To scratch the surface, ProRes files are loosely compressed, and your GPU finds it easy to process them during both editing and playback. This is not the case with MP4 files, and they do require more processing than ProRes. You can still work with MP4 video, if you stuff your computer with RAM and it has enough processing power, but this is always going to be second-best to working with a codec (e.g. ProRes, DNxHD) that is designed for editing.
So, what's so good about Apple ProRes?
What's good is that Apple ProRes doesn't compress the video as much. It trades storage space and bitrate for quality and ease of processing. ProRes typically needs ten times as much storage. That's a lot, but hard drives are tending towards being free, so it hardly matters these days. Because ProRes files are already loosely compressed, your computer's GPU doesn't have to put additional efforts to decompress the data for processing when footage is opened in a media player or imported to a post-production program for editing.
ProRes is a 10-bit codec. This means that in contrast with others, ProRes files have more shades while working with Color Grading options in a post-production tool. In ProRes, each frame of footage is compressed individually (I-frame). This is the reason the files are big. However, such type of approach puts less load on the GPU as it doesn't have to decompress complex compression architecture while editing.
Overall, MP4 is really optimized to be a delivery codec while ProRes is optimized to be an editing codec. That said, if you just need to do a simple edit and your Mac has the power to edit MP4 you can get away with it no problem, but if you plan to do a heavy edit with lots of transitions and effects and color grading you will be best served by ProRes.
Once you've converted footage from MP4 to Apple ProRes, your edits will fly. These codec is so efficient that you can play multiple streams with a fraction of the effort you need for a single stream of H.264 or H.265 - based MP4 video. As an example, on my Macbook Air, playing any HD Long-Gop clip will cause the fan to come on at full power within seconds, but with ProRes, I can play a clip - in much higher quality - with no sign of the fan.
What's the Best MP4 to ProRes Converter for Mac/Windows?
There is a long list of software tools out there that allow you to do video transcoding. But the catch is that not all transcoders can encode videos to Apple ProRes or other "professional" codecs. So far I've not found a good free transcoder that meets those requirements, but there is an easy-to-use yet powerful encoder and decoder - EaseFab Video Converter for Mac - that can help you convert MP4 to Apple ProRes 422, Apple ProRes 4444 and other types of ProRes codecs.
This program features high efficiency and seamless conversion. It bridges this gap by providing one of the simplest user interfaces, and the pre-configured presets that you can use to batch convert and process footage in virtually any format, incl. hevc, h.264, mp4, mkv, avi, wmv, m2ts, avchd, in whatever resolution or codec. to ProRes in simple clicks of the mouse. It also supports some basic video editing features such as trimming, cutting, merging, adding subtitles, and more others. This software also comes with a Windows version for those who want to encode video to ProRes on Windows 11, Windows 10 or lower.
EaseFab Video Converter- Best Apple ProRes Encoder and Decoder
- Supports all the types of Apple ProRes codec as outputs on both Mac and Windows - Apple ProRes 4444, Apple ProRes 422 (HQ), Apple ProRes 422, Apple ProRes 422 (LT), and Apple ProRes 422 (Proxy)
- Batch conversion from various formats including but not limited to H.264, HEVC, MKV, AVCHD, AVI, VOB, MOV, HEVC, M2TS, MTS to ProRes codec in only three simple clicks.
- Convert MP4 files with optimized presets for Final Cut Pro, iMovie, Avid Media Composer, Adobe Premiere, iPhone, iPad and more devices.
- Edit MP4 video files with trimming, cropping, cutting, merging, adding subtitle, etc.
Now free download and install this best MP4 to ProRes converter on your computer and follow the tutorial below to transcode MP4 or other videos to ProRes codec for faster editing.
How to Convert MP4 to Apple ProRes with 3 Simple Clicks
The step-by-step guide is almost the same on Mac and Windows. Here we will take EaseFab Video Converter for Mac as example to show you how to transcode MP4 video to Apple ProRes codec on Mac.
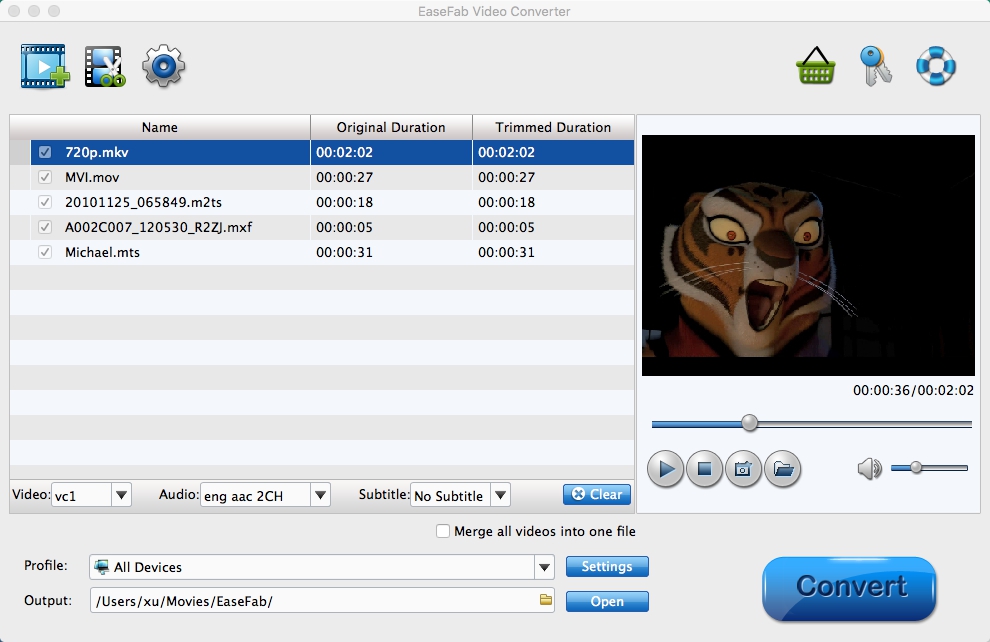
Step 1. Add MP4 files to the software.
Drag and drop MP4 videos to the application. Or you can click Add Video button to browse and locate your source video files. (Note: batch conversion is supported, so you can load more than one file to save time.)
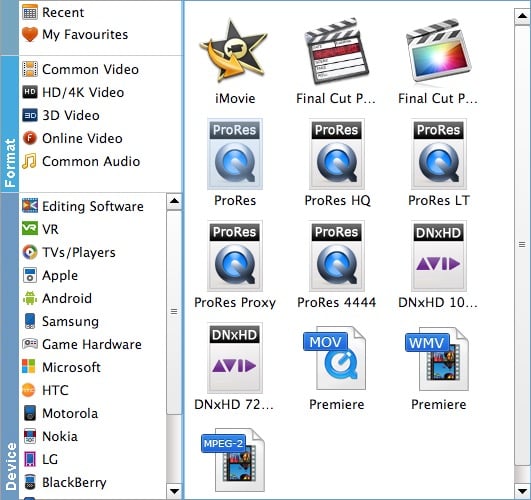
Step 2. Select ProRes as the output format
Now click the Profile icon to reveal output panel. Move mouse cursor to Editing Software category, then click and select ProRes as the output format. If you want to get the highest quality, ProRes 4444
Tip: Click the Settings button and customize proper video/audio parameters if necessary. Video size, bitrate and fame rate are flexible and can be adjusted as you like. Usually 1920*1080 video size and 30fps video frame rate are recommended for editing.
Step 3. Start encoding MP4 to ProRes
At this point, you can change the output filename or output path if you wish. If you feel satisfied with your options, Just hit the Convert button to activate MP4 file to Apple ProRes conversion.
When all conversions completed, you'll get a pop-up notice. Just click Open button, you can fast find where your converted ProRes encoded MOV files are saved.