How to Use VLC to Compress Video from GB to MB without Losing Quality


Summary: Here are 5 ways to reduce video file size with VLC by changing crucial factors. We also cover where VLC falls short for compressing video.
VLC is a powerful and well-loved application for playing virtually all media files, but few users realize it has a lesser-known capability that allows you to compress videos. Shipping with a full transcoding engine, VLC can reduce video file sizes for easy sharing on email or social media. In this guide, we will introduce 5 ways to compress videos with VLC, including reducing video bitrate, changing the video codec, downscaling video resolution, changing audio settings and cut unwanted parts. We also cover the hidden drawbacks of using VLC for video compression and introduce some dedicated encoders yield much better results.
Table of Contents
- 5 Methods to Compress Video with VLC
- #1. by Reducing Video Bitrate
- #2. by Changing Video Codec
- #3. by Downscaling Video Resolution
- #4. by Changing Audio Settings
- #5. by Cutting Unwanted Parts
- The Limitations of Compressing Video with VLC
- Try A Better VLC Alternative - Compress Video 90% Off, No Quality Loss
- FAQs
5 Methods to Compress Video with VLC
Before compressing your videos, let's make sure the key factors that determines the file size of a video. From the formula "video size = bit rate x duration", we can draw that the video's duration (length) and its bitrate are definitely the main culprits behind large files, several other video parameters, say video codec, resolution, frame rate that play a significant role too.
VLC provides extensive control over video codec, bit rate, and frame rate so you can reduce video file size with VLC by adjusting these key parameters. So, no more other words, just check how VLC compresses the file size of the video below. Make sure you have VLC installed on your computer.
Method 1. Compress Video with VLC by Reducing Video Bitrate
The bitrate of your video is one of the most direct and powerful controls you have over its final file size. Lowering bitrate from its original value can reduce the amount of data stored per second of video so that you can achieve substantial file size savings. But, noticeably, this usually brings noticeable loss in quality, particularly in fast-moving scenes.
1. Open VLC and go to Media → Convert / Save, then select your video.
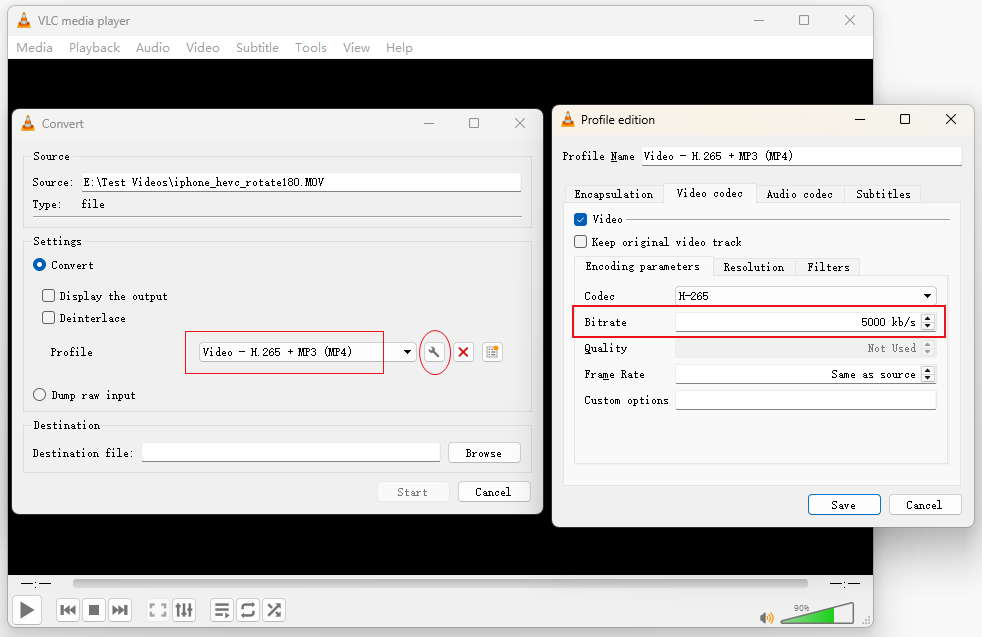
2. Click on Convert/Save on this panel. Choose Video – H.265 + MP3 (MP4).
3. Click the wrench icon to navigate yourself to the profile edition panel. Click Video Codec.
4. Adjust the bitrate to a lower value than the original. For 1080p, try 5000–10000 kbps; 720p, 2500–6000 kbps; 480p, ~2500 kbps.
Note: Lowering the bitrate makes the file smaller without changing the video length. But be cautious not to set it too low. For instance, with SDR 24 fps video, it's generally not recommended to set the bitrate below 22 Mbps (22582 kb/s), as doing so can lead to noticeable pixelation or loss of detail.
Method 2. Reduce File Size with VLC by Changing Video Codec
Changing the video codec (e.g. H.264 to H.265) is a simple and effective way to compress video with VLC. More efficient codecs produce smaller files at the same visual quality. In practice, HEVC/VP9 can reduce size by up to ~50% versus H.264 at similar quality, and AV1 is typically another ~20–30% smaller than HEVC/VP9.
Step 1. Click on Media > Convert/Save. Hit +Add and choose the source video that needs to be compressed via VLC. Tap on Convert/Save again when you are done.
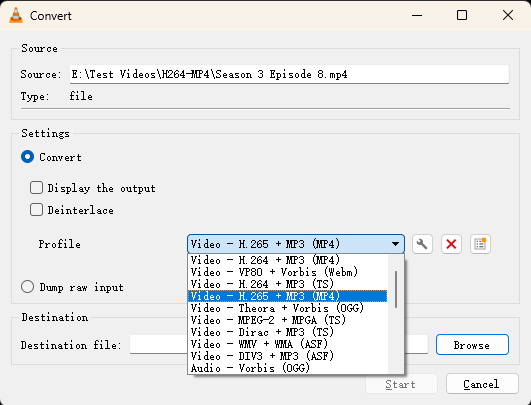
Step 2. Select Video – H.265 + MP3 (MP4) or Video – H.264 + MP3 (MP4) as your output profile.
Tip: If you fail to find the video codec you wish to use, click on the Wrench icon next to the Profile option and access the Video codec panel, where you can find more video codec formats to work with.
Step 3. Click Start to convert the video, generating a compressed version in the selected format.
Note: Currently, VLC doesn't support AV1 output. If you want to achieve extreme compression without sacrificing picture quality, you can try EaseFab Video Converter, which supports AV1 encoding and offers a much easier way to compress videos.
Method 3. Compress Video with VLC by Downscaling Video Resolution
Downscaling resolution to lower via VLC offers a direct path to making a video smaller. A 4K video downscaled to 1080p is roughly 4x smaller at the same bitrate.
Step 1. Again, click on Media > Convert/Save, and add the source video to the VLC video compressor.
Step 2. click Convert/Save to select an output profile.
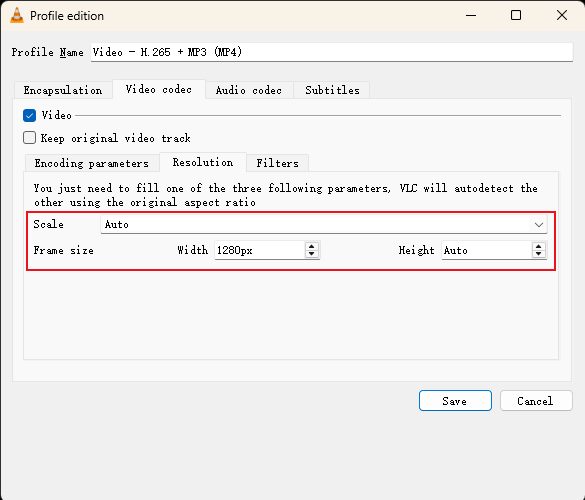
Step 3. Click the wrench icon on your selected profile. Open the Video codec tab and check Video. Scroll down to find the Resolution section.
Step 4. Enter your target width and height:
- 1920×1080 → 1280×720 (halves file size roughly)
- 1920×1080 → 854×480 (reduces to ~25% of original)
- 3840×2160 → 1920×1080 (quarter the pixels)
Tip: Set only the width and leave height at 0 — VLC will calculate the correct height to maintain the original aspect ratio automatically.
Step 5. Save the profile, set output path, click Start.
Method 4. Reduce Video File Size with VLC by Changing Audio Settings
Reconfiguring the audio parameters like audio codec, bit rate, sample rate, etc. won't make much difference on your video size since the audio only account for 5-15% of total file size. But it's worth a try to reduce the audio bitrate from 320kbps to 128kbps, or from uncompressed PCM audio to MP3. Sometimes, this method can meaningfully reduce file size without compromising image quality.
Step 1. Click on Media > Convert/Save. Hit +Add and choose the source video that needs to be compressed via VLC.
Step 2. Click on Convert/Save on this panel. Choose Video – H.265 + MP3 (MP4).
Step 3. Step 3. Click the wrench icon to navigate yourself to the profile edition panel. Click Audio Codec and check Audio to enable audio encoding.
Step 4. Set Codec to MP3 or AAC (MPEG 4 Audio). And then set Bitrate to 128 kbps (good for most content) or 192 kbps (music-heavy content). Set Channels to 2 (stereo) unless you have a specific need for surround.
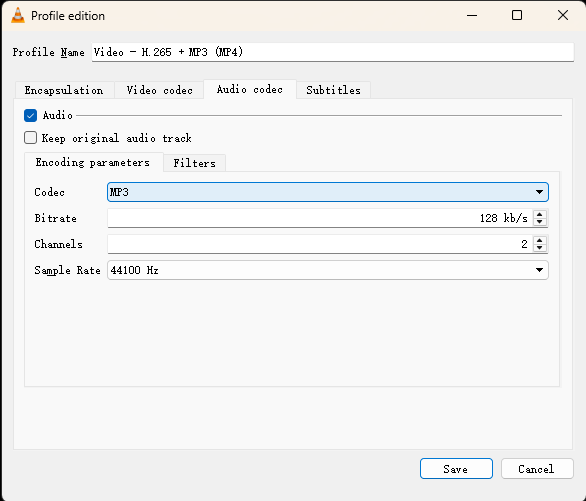
Step 5. Save and start the conversion.
Method 5. Compress Video with VLC by Cutting Unwanted Parts
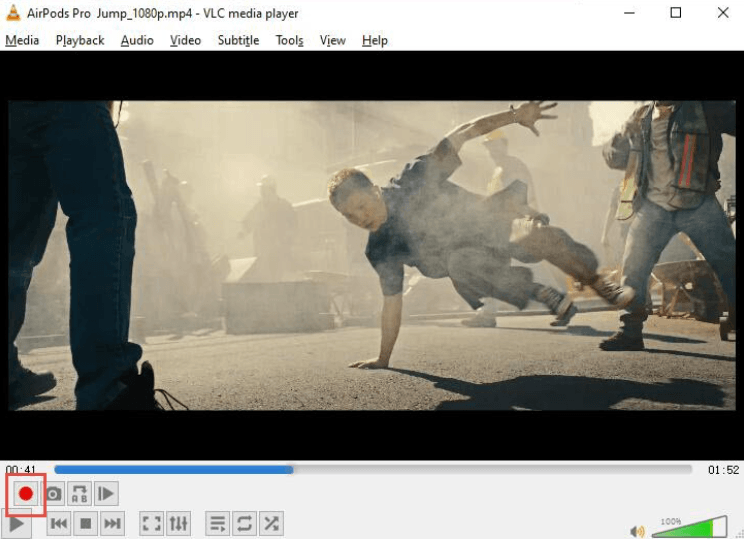
Although VLC doesn't directly trim video length, you can achieve it by recording a portion of the clip. Simply drag the video to the desired starting point, play the video, and click the recording button. When the video reaches the desired ending point, click the recording button again to complete the process.
The Limitations of Compressing Video with VLC
VLC is a fantastic media player but a mediocre file compressor. Compared to dedicated compression tools, it presents several key limitations:
No Batch Processing: You can only compress one video at a time, making it tedious if you have multiple files to convert.
Slow Encoding Speed and Subpar Stability: VLC relies on software-based encoding, which is significantly slower than dedicated compression tools that leverage modern GPU hardware acceleration (like NVIDIA NVENC or Intel QSV). Furthermore, VLC is prone to instability, often crashing or failing the conversion process when handling large or complex high-resolution files.
Lack of Precise Control over Bitrate and Quality: You cannot easily adjust the specific bitrate (the primary factor controlling file size and quality) or use advanced features like two-pass encoding for optimal compression efficiency. This often results in output files that are either unnecessarily large or suffer from noticeable quality degradation. You won't know how the compressed video looks until the conversion finishes. If quality is unacceptable, you start over.
Limited Format and Codec Customization: While VLC supports a wide array of codecs, the "Convert" interface can be confusing or restrictive. It lacks the advanced, easily accessible settings for emerging high-efficiency codecs like AV1, forcing users to stick with older, less efficient standards for simpler workflows.
Try A Better VLC Alternative - Compress Video 90% Off, No Quality Loss
While VLC can perform basic video compression by adjusting the output settings, it lacks advanced tools like batch processing, precise bitrate targeting, and modern hardware acceleration. If you frequently compress videos or require greater control over the output file size and quality, you may consider using specialized video compression tools like EaseFab Video Converter.
EaseFab Video Converter offers an easier and faster way to reduce video size. Instead of complicated fixes, you just need to compress multiple videos in batch with 3 simple steps. Moreover, advanced compression kernel and higher coding-efficient codecs (AV1, HEVC, H.264, etc.) are tailor-made to reduce file size by up to 90% with quality unaffected visually. By using hardware acceleration, it can reach a 30X faster speed when processing large 4K/8K video compression without CPU overuse.
How to Reduce Video Size with EaseFab Video Converter
Step 1: Import Video File
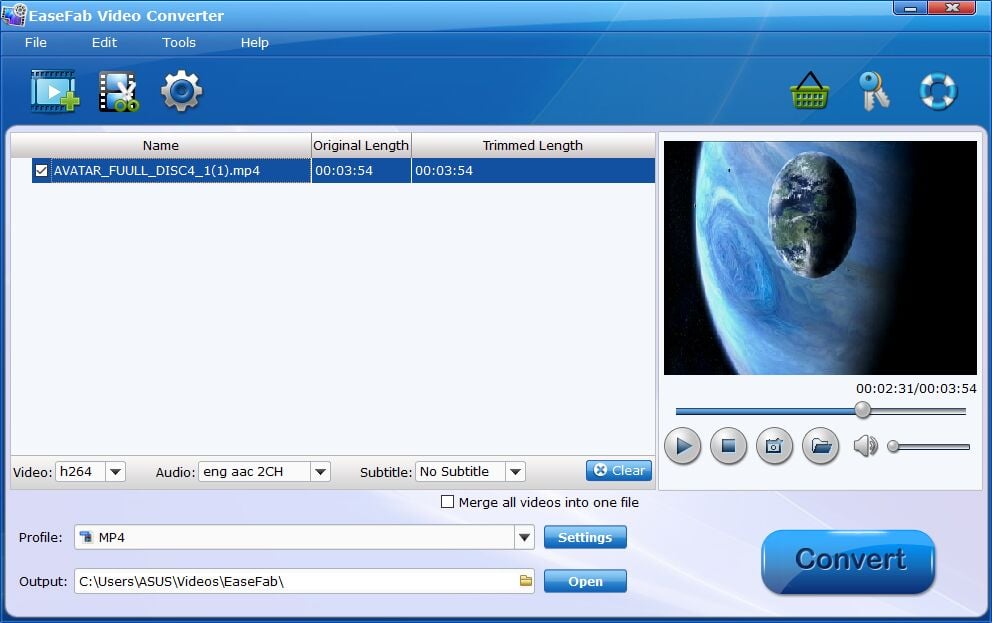
Download the launch the video reducer and then click Add Video button to browse and import the video file(s) you want to reduce to the program.
Step 2: Reduce Your Video in Different Ways
With the better VLC compressor alternative, you can downsize your video through 3 aspects: choose a video format with smaller size, trim or crop your video with smart editing features, and adjust the video parameters like resolution, frame rate, encoder and more.
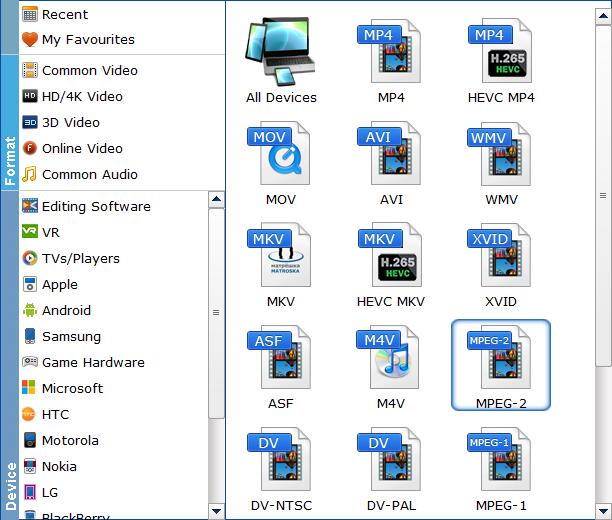
1. Choose a video format with smaller size: Click Profile (located below where your files are displayed) and select a format for conversion. Different codecs like AV1, MPEG4, H.264, and HEVC have different qualities (generally, AV1 > HEVC > H.264 > MPEG4), To keep the the visually same quality when compressing videos, AV1 is the best choice.
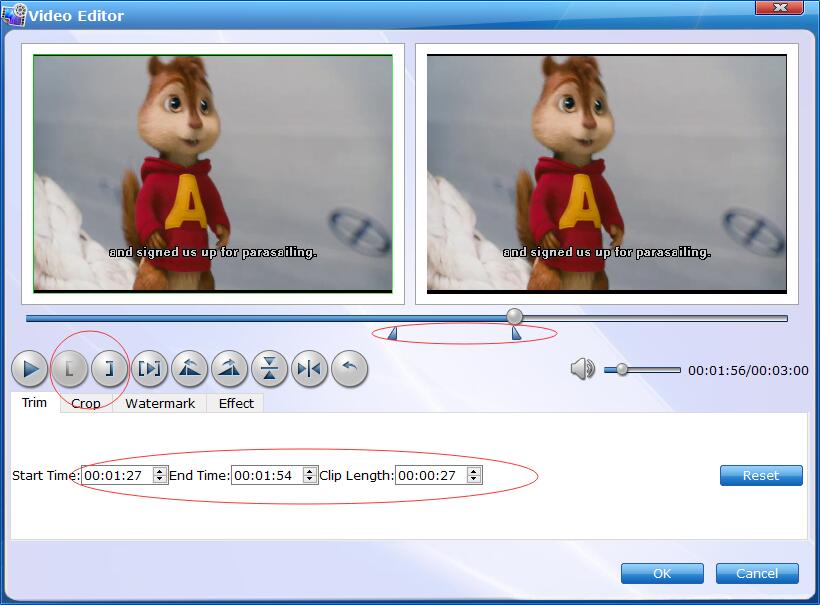
2. Trim or crop video: Click the Trim or Crop in Video Editor window to resize the video size, learn the deatailed steps here.
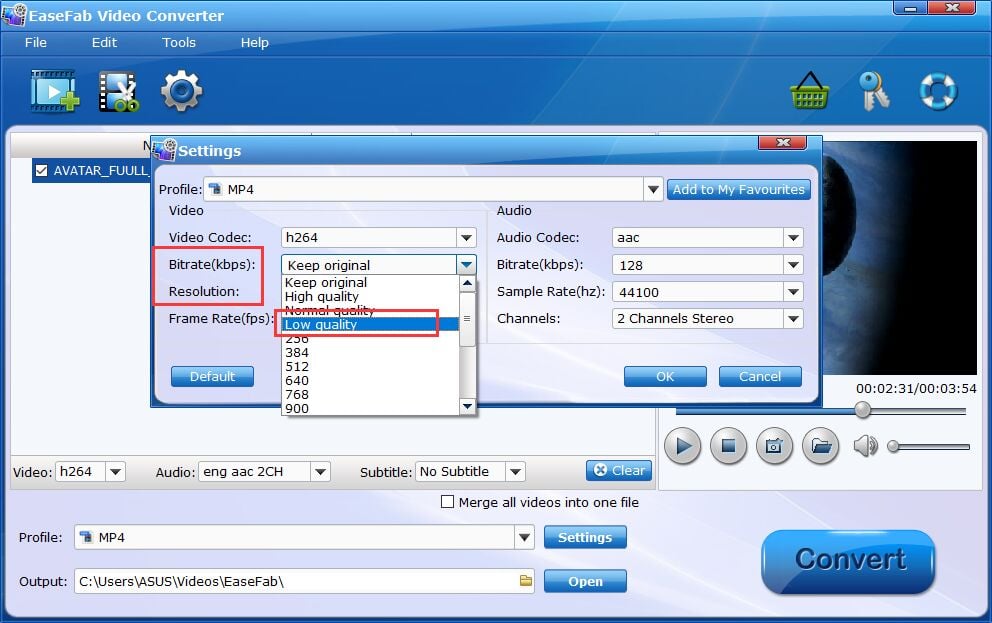
3. Adjust video parameters: To further shrink the video size, click the Settings button to enter the Settings window. In the window, you can directly select the Low Quality option from the drop-down list of Bitrate and let the program resize the size of video immediately (or you can manually change the settings like resolution, bit rate, frame rate, encoder by yourself).
Note: After reducing the size of the video, the quality of the video will decrease. So you should strike a balance between the size and quality. And the key influence factors of minimizing video size is the bitrate and the resolution.
Step 3: Start Reducing Videos
Once you're satisfied with above settings, the VLC alternative will start reducing video size by a simple click on the big Convert button.
FAQs about Compressing Video with VLC
How long does VLC take to compress a video?
Compression time depends on video length, resolution, and your computer's CPU speed. VLC uses software encoding (no GPU acceleration on most systems), so a 10-minute 1080p video might take 5-15 minutes. Dedicated tools with hardware acceleration are typically 5-10x faster.
Why do compressed videos look blurry or "washed out"?
This often happens when HDR metadata is dropped or when color spaces are incorrectly converted (such as BT.2020 to BT.709) during transcoding. VLC's basic presets offer limited control over color space, bit depth, and quality retention, which can affect 4K or HDR footage. Using modern codecs like HEVC or AV1, along with smarter bitrate allocation, helps preserve color accuracy and detail while significantly reducing file size.
Can I compress video without losing quality using VLC?
Yes. You can do this by trimming unwanted sections with the "Record" feature. Adjusting the bit rate or converting formats can also reduce file size, but trimming helps preserve the original quality as much as possible.


 Sales Team: