Notes plays an important part in our daily life. Usually, we will use it to record work related points like daily schedule, shopping list or a memorandum. What if those import notes are deleted from your iPhone by accidently or you lose those notes from your iPhone due to various types of reasons like a failed jailbreak or iOS upgrade, etc.? Keep your shirts on! You can fix it! In this article, we are going to indroduce 3 ways to recover deleted notes on iPhone.
3 Solutions to retrieve deleted notes from iPhone XS (Max)/iPhone XR/iPhone X/iPhone 8 (Plus)/7 (Plus)/6s (Plus)/6 (Plus)/5/5s/5c/4s/4/3GS
When it comes to recovering deleted notes on iPhone, the first choice emerged in our mind is via iTunes or iCloud backup. Yes, you can restore your iPhone to get back anything you lost that have been backed up by iTunes and iCloud, while this method has several limits:
1. You have made an iTunes or iCloud backup in advance.
2. The iTunes or iCloud backup contains the notes you want to get back.
3. Once you choose to restore your iPhone to undelete lost notes, all the things on your iPhone will be replaced by the contents in the backup.
If our deleted notes are not backed up in the latest iTunes backup or iCloud backup, then we have to recover it from our device. Actually, there are many data recovery tools in the marketing, then which one is better? Here we suggest our users try EaseFab iPhone Data Recovery. This software is easy to use and can help you undelete lost notes from iPhone directly. Besides, it enables to extract and restore lost data from iTunes or iCloud backup selectively if you have backup files for those lost notes. Plus, within the help from the iOS data recovery tool, you can transfer undeleted notes back to iPhone directly as well as contacts and messages. So cool that it deserves the best one.
Tips: whenever you find notes deleted or gone from iPhone, firstly please turn on Airplane Mode or power off your iPhone directly, then back up data for iPhone just in case of deleted notes from being wiped by new added ones forever.
Before recovering those lost notes from iPhone, it is necessary to download and install EaseFab iPhone Data Recovery on your computer. There are two versions accessible: Windows version and Mac version.
Part 1: Directly Recover Deleted Notes from iPhone
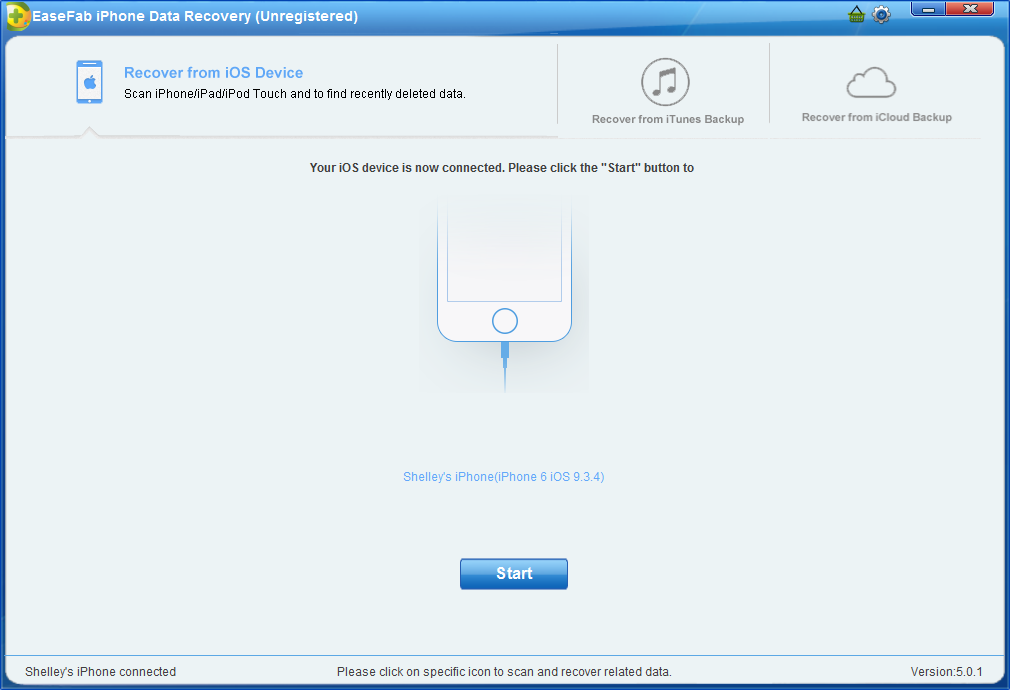
Step 1. Connect your iPhone to PC
After in stalling the program on your computer, run it. Then connect your iPhone to the computer. When the program detects your iPhone, simply click Start button to begin.
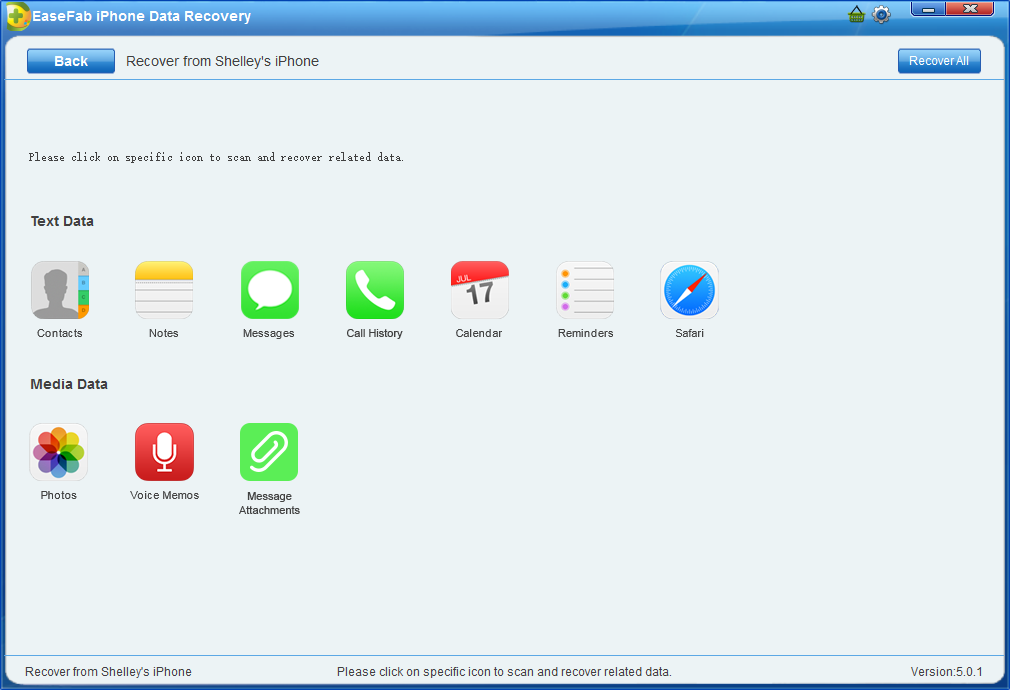
Step 2. Scan notes from iPhone
Click on Notes item to start scanning and analysis.
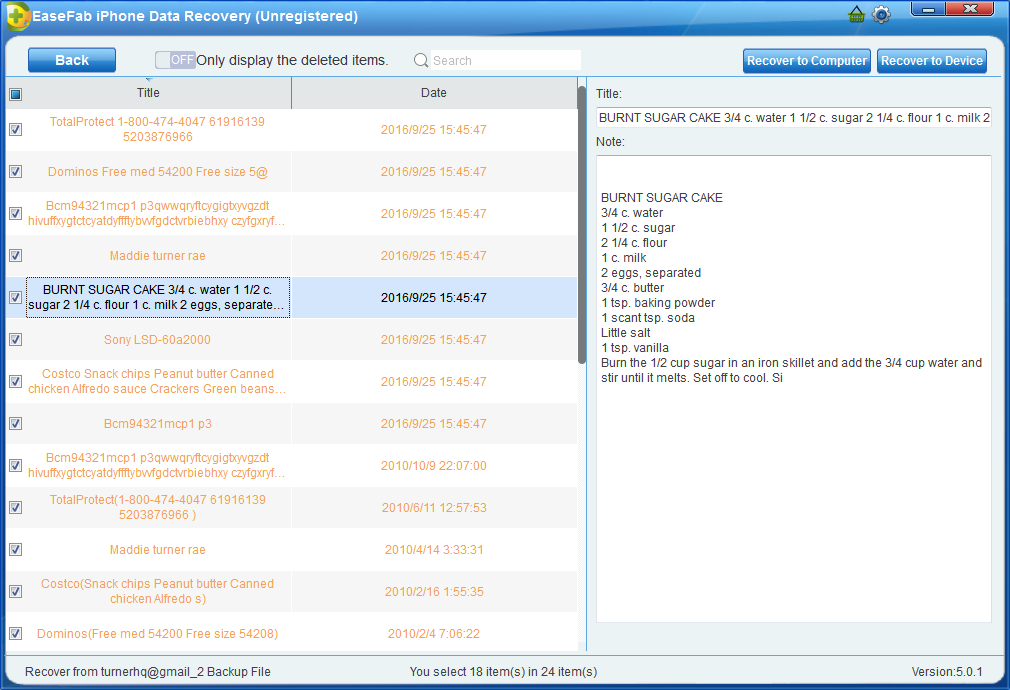
Step 3. Preview and select lost notes to recover
Now after scanning, you can pick out all deleted notes and then, click Recover to Device button to finish the whole process.
Part 2: Recover Deleted Notes on iPhone via iTunes Backup
If we have backed up iPhone with iTunes before, then we just need to retrieve our deleted notes from iTunes backup. This is much easier and faster. Now let's check the steps below.
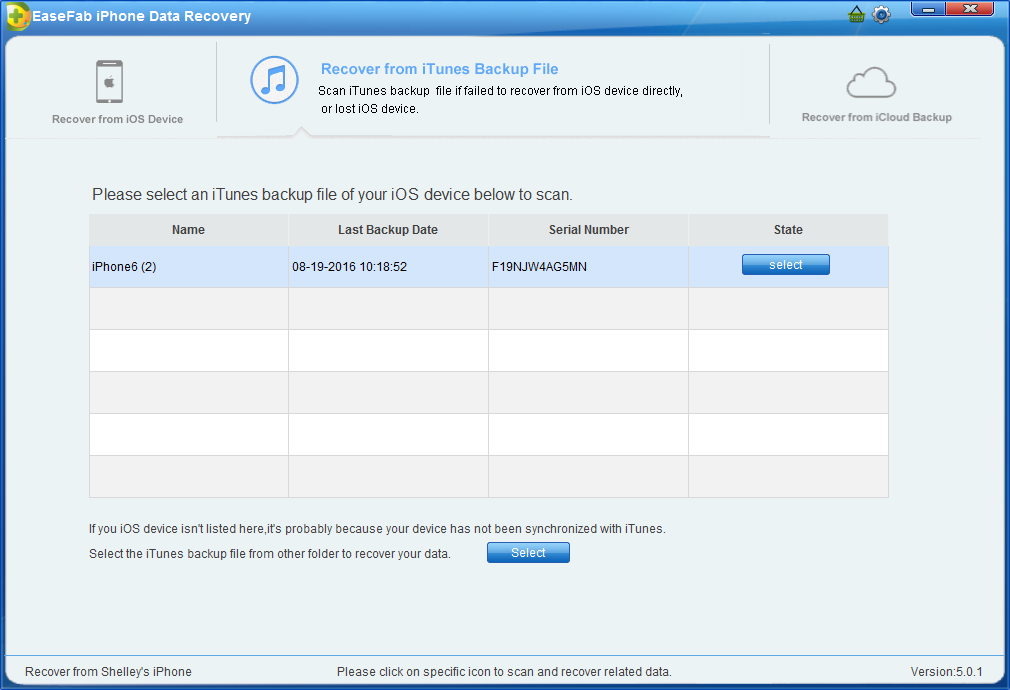
Step 1. Choose and extract the iTunes backup
After running the program, switch to Recover from iTunes Backup File by clicking on the option on the top of the window. Then the program will detect all iTunes backup files existing on your computer and present them all for your option. Choose the one for your iPhone and click Select. And then click on Notes item to start analysis process.
Step 2. Scan, Preview and Recover
It will take quite a time for EaseFab iPhone Data Recovery to scan and analyze the data from your iTunes backup file, please wait patiently. After the scanning process completes, please take a preview at all the exported data. Then you can selectively mark and recover those you want by pressing the "Recover to Device" button at the top right of the window.
Part 3: Restore Deleted Notes on iPhone via iCloud Backup
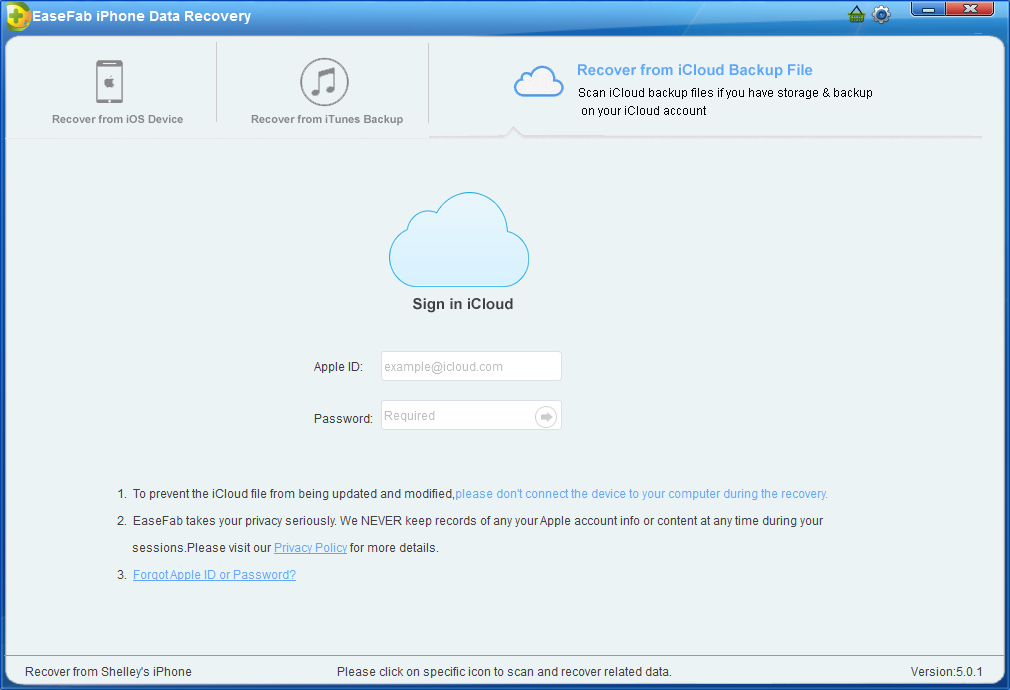
Step 1. Choose Recovery Mode
After running EaseFab iPhone Data Recovery, choose the recovery mode of "Recover from iCloud Backup Files" on the top. Then you'll see the window below. Enter your iCloud account and password to login. EaseFab iPhone Data Recovery takes your privacy seriously. We never keep a record of any your Apple account info or content at any time during your sessions.
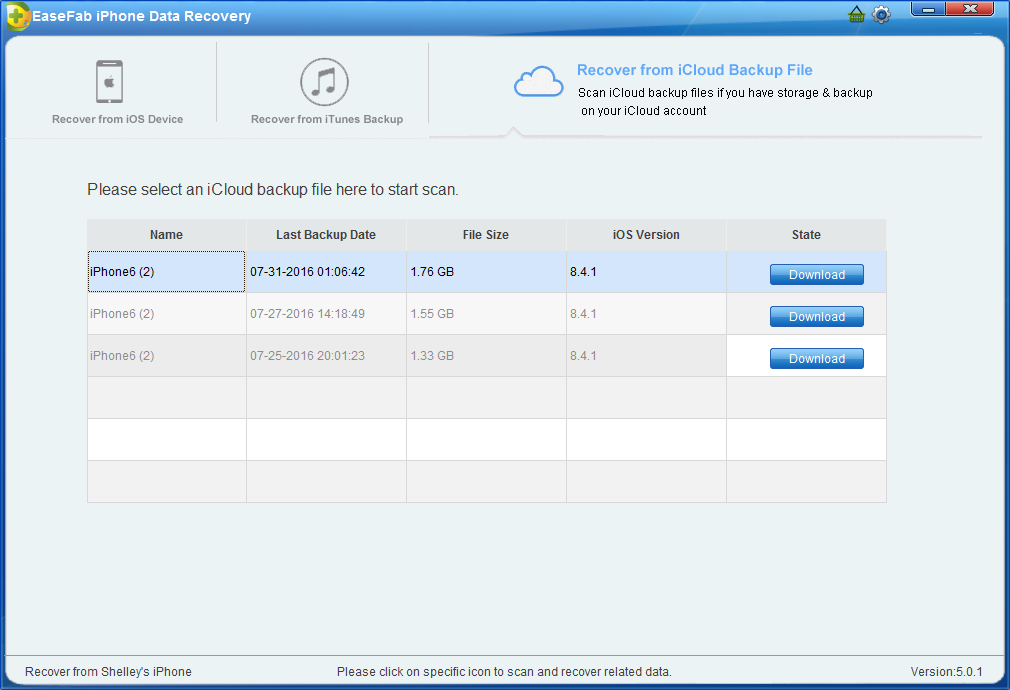
Step 2. Download iCloud Backup File
When you logged into iCloud, the program can find all iCloud backup files in your account. Choose the one where you're going to recover data and click on the "Download" button.
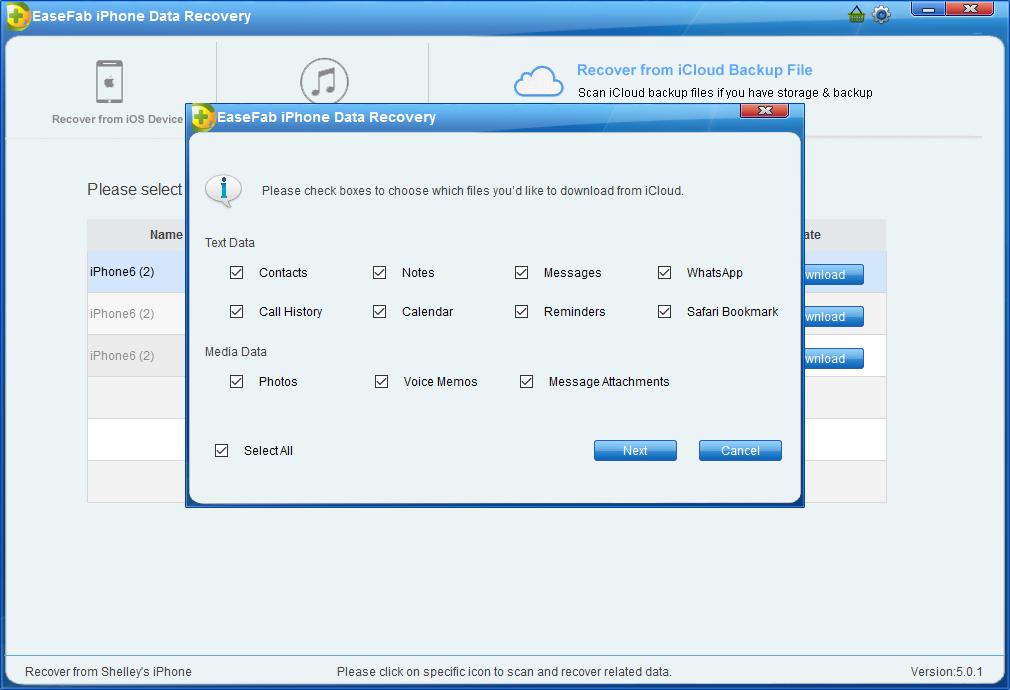
And a window will pop up for you to choose the type of files you would like to download. This will reduce the time of downloading the iCloud backup file. After finishing the downloading, you will be presented with the interface asking you choose data to recover. In this way, you can selectively recover whatever data as you need. For Notes only, just mark Notes.
Step 3. Scan and Recover
It will take some time for EaseFab iPhone Data Recovery to scan and analyze the data, please wait for a while with patience. Preview the files downloaded and choose the notes. Click on "Recover to Device"? We can then choose whether we want to save the files on our computer or on our device.