Posted by Matthew Watt - Sep 07, 2021 | Contact Author![]()
Tips & Tricks for Editing MTS Files in Premiere Pro Smoothly
"Hello, I was wondering if anyone using Premiere Pro 2020 had experienced issues with .mts files. I've been trying to create a video with footage all from .mts files, but they are causing me a plethora of problems."
"After a minute or so of editing .MTS footage from a Sony camera, the preview goes black but I can still play and hear the audio from the footage. I can edit .MP4, .MOV, and everything else fine except for .MTS. Is there a setting I can change to fix this problem editing .mts footage in CC 2019?"
As a timeline-based video editing software application, Adobe Premiere Pro comes with ability to stabilize shaky clips exported from your Sony/Panasonic camcorder or video camera. Although Adobe claimed that Premiere Pro CS5 and above offer much better native AVCHD support than it predecessor. the users who want to edit MTS videos with Premiere Pro usually run into incompatibility issues. Or you can't edit them smoothly after taking some time for importing MTS to Adobe Premiere. Why? This is due to that MTS videos, which are already highly compressed by H.264 codec (also known as long-GOP compression), are very hard to deal with during video editing.
To edit MTS footage in Premiere Pro smoothly, the easiest and most efficient solution is to transcode MTS to Adobe Premiere edit-friendly codecs. And Apple ProRes is the best choice for smooth editing since the codec sits in a kind of "sweet spot" between the humongous data rates of uncompressed video, and the egregious processing demands of Long Gop MTS video. Once you've converted, your MTS edits in Premiere Pro will fly.
Get a Reliable Program to Transcode MTS to ProRes for Adobe Premiere
There are a list of video encoding software tools on the market. The catch is that not all transcoders can encode to ProRes or other "professional" codecs. And the choices are further narrowed down because you need a transcoder that is coming with its own codecs rather than just relying on those built into the operating system. Currently, there is a good transcoder entitled EaseFab Video Converter that help you get the job done easily. The expert ProRes converter is available for macOS Big Sur and lower and it has a Windows version compatible with Windows 10, 8, 7.
With it, you can convert almost any video files including but not limited to MTS/M2TS, MP4, MXF, HEVC, H.264, MKV, MOV, VOB, etc. to ProRes with 3 simple clicks. The result ProRes codec ensures the maximum editing quality and efficiency when working with Adobe Premiere Pro CC, iMovie and Final Cut Pro. Besides ProRes, you can also encode to professional codecs like DNxHD, Apple Intermediate Codec for for fast and fluid workflow. It also supports basic video editing features like trim, cut, crop, merge, add subtitle, etc.
The step-by-step guide is almost the same on Windows and Mac. Here we will take EaseFab Video Converter for Mac as example to show you how to transcode and import MTS files to Premiere Pro for smooth editing on Mac.
[Tutorial] How to Decode MTS to Adobe Premiere Supported ProRes Codec
Step 1. Add MTS files
Click Add Video button or drag and drop to add MTS files from your Mac to the program. You can add many MTS files and convert them at one time.
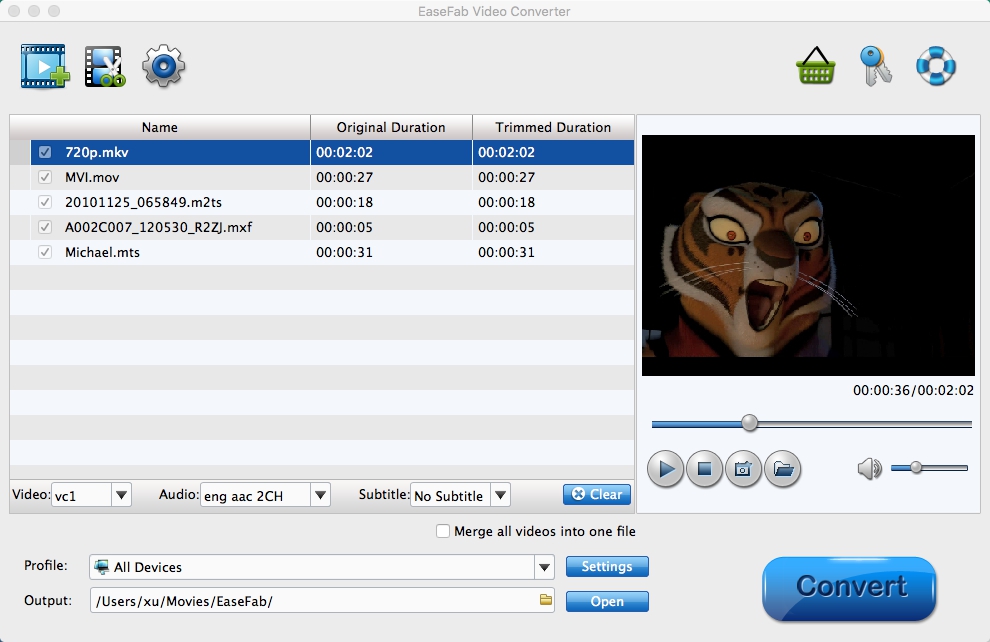
Step 2. Select ProRes as output format
Now click the Profile icon to reveal output panel. And and mouse cursor to Editing Software category. You'll find several ProRes formats are provided. Generally, ProRes or ProRes LT are suitable choices for MTS, M2TS, DV videos shot with camcorders. ProRes HQ is usually for film based source media. For common editing, you just need to select ProRes as the output file. If you want to get the highest quality, ProRes 4444 is recommended.
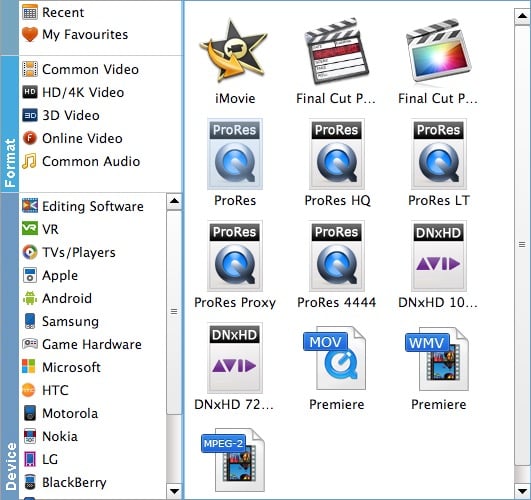
Kindly Note: Apple ProRes codec doesn't compress the video as much. They trade storage space and bitrate for quality and ease of processing. But the converted ProRes file typically need ten times as much storage. That's a lot, but hard drives are tending towards being free, so it hardly matters these days.
Step 3. Start conversion
Click the small Folder icon in the output bar to select a folder to save the converted ProRes files. When you have finished everything, simply click the big Convert button to perform MTS to Premiere Pro ProRes conversion in no time.
Once the conversion completes, you can import the converted MTS files to Premiere smoothly.
Final Words:
If you're having trouble editing MTS files in Premiere Pro, Final Cut Pro, iMovie or Avid Media Composer, transcoding MTS to ProRes or DNxHD will be an efficient solution to quickly solve your problem. Both ProRes and DNxHD are effectively "visually lossless" at their higher bitrates. That means exactly what it says: you can't tell the difference between your original video and the same material encoded to ProRes or DNxHD. And EaseFab Video Converter is a highly-recommended program to help you get the encoding job done fast and losslessly.
Once you've converted, your edits will fly. These codecs are so efficient that you can play multiple streams with a fraction of the effort you need for a single stream of H.264 - based video. As an example, on my Macbook Air, playing any HD Long-Gop MTS clip will cause the fan to come on at full power within seconds, but with ProRes, I can play a clip - in much higher quality - with no sign of the fan.
Other Useful How-to Guides & Tips
How to Convert and Import MTS File to iMovie
Trouble import single mts files to iMovie? Follow this article to find out an easy way to fix this error.
How to Fix AVCHD MTS and DaVinci Resolve Incompatibility Issues
The easy workaround to work with AVCHD .mts files in DaVinci Resolve is to convert MTS to DNxHD codec, something ensures the best results when using in DaVinci Resolve.
How to Work with MTS files in PowerDirector
Trouble importing MTS files into PowerDirector for editing? Slow choppy playback of .mts format in PowerDirector or no audio with .MTS video? Simply follow the best solution to fix these problems.
How to Convert MTS files to Edit in Sony Vegas
The article offers you an easy Sony Vegas MTS solution for importing your MTS files to Sony Vegas Pro as well as M2TS to Sony Vegas.
ABOUT THE AUTHOR

Matthew Watt 
Matthew Watt is an amateur tech enthusiast, but now a sought-after editor at EaseFab. He is responsible for writing contents on DVD, digital video, audio, software reviews, new digital contents etc. He continues enjoying painting and comics, and is currently fascinated with photography.
Copyright © 2026 EaseFab Software Corporation. All Rights Reserved.