How to Convert and Upload DVD to YouTube on Windows/Mac


Summary: Is it possible to transfer a DVD to YouTube? What if you want to upload a clip or a scene off a DVD to YouTube? The only way is to convert DVD to a digital format that YouTube can read. Here is the simple how-to.
As the largest video sharing platform globally, YouTube offers a diverse range of content, from educational videos and music videos to vlogs and live streams. Users can upload videos, create playlists, and interact with their audience through comments and live chat features. If you have some home-movies (e.g. the wedding video, travel vlog, or memorable party moments) or commercial movies on DVDs, you may want to upload them or a clip on DVD to YouTube for sharing with other YouTubers.
However, if you try to upload DVD directly, you will end up with failure - it may not play correctly and the quality may be compromised since DVDs are not supported by YouTube. To ensure your DVD video play smoothly and looks great, you may have to convert DVD to a digital format that is compatible with YouTube. In the following page, we will walk you through how to convert convert DVDs to YouTube-supported formats with optimized settings for uploading.

How to Upload DVD to YouTube?
Note: Nowadays, more and more formats are supported by YouTube, like MP4, MOV, MPEG, AVI, WMV, FLV, 3GPP, WebM, ProRes, CineForm, HEVC (h265), but definitely not including DVD or VOB format. Besides video format, there are some other restrictions you should know before uploading DVD to YouTube:
- 1. You cannot upload commercial DVD or video concerning intellectual property without permission as it is illegal to do so.
- 2. By default, you're only allowed to upload DVD digital files that're no more than 15 minutes. To upload longer videos, you need to verify your account.
- 3. The 16:9 aspect ratio is the best ratio for YouTube videos and any other professional video content. If you upload a 4:3 video on YouTube, you will get black bars. So you need to convert DVD video from 4:3 to 16:9.
Step 1. Get A Proper DVD to YouTube Converter
There are numbers of paid or free programs that allow you to rip DVD to a digital format that is compatible with YouTube. If you're interested in backing up your DVD collection and don't want to be held back by time restrictions or slow processing, EaseFab DVD Ripper will be your best choice. As a versatile and efficient DVD ripping software, it can:
- Rip any DVD, including burned DVDs, home-made DVDs, copy-protected and region-locked DVDs;
- Convert DVD to any YouTube compatible format, such as MP4, MOV, AVI, WMV, FLV, Web, ProRes and HEVC;
- Trim DVD video length, add external subtitle to DVD video, crop video image, merge video clips, etc.;
- Change DVD 4:3 aspect ratio to YouTube 16:9, adjust resolution, frame rate, bit rate, reduce file size to better fit YouTube;
- Finish DVD conversion at least 3X faster speed than common DVD rippers on the market;
- Shrink up to 80% file size of the source DVD movies with the highest image quality.
This DVD to YouTube converter is available for Windows 11, 10, 8.1, 8, 7, Vista, XP, etc. And it also comes with a Mac version that can assist you in ripping and uploading DVD to YouTube on Mac OS X 10.5 or later, including latest macOS 15 Sequoia.
Step 2. Convert DVD to YouTube Friendly Format with Desired Length and File Size
To begin with, you need to download and install this DVD to YouTube converter Windows or Mac version on your computer. The guide below takes the Windows version for an example. Mac version has the same process.
Step 1: Load the source DVD.
Insert the DVD disc into your computer's DVD drive or an external USB DVD drive. Launch EaseFab DVD Ripper, click Load DVD to add the DVD files to the program. All loaded files will be displayed on the left item bar. You can preview them on the right and take snapshots of your favorite movie scenes.
Open the drop-down list of the subtitle column and choose one subtitle track you want. Options for you to choose: internal subtitle track such as English, French, No Subtitle (default), Add Subtitle, etc.

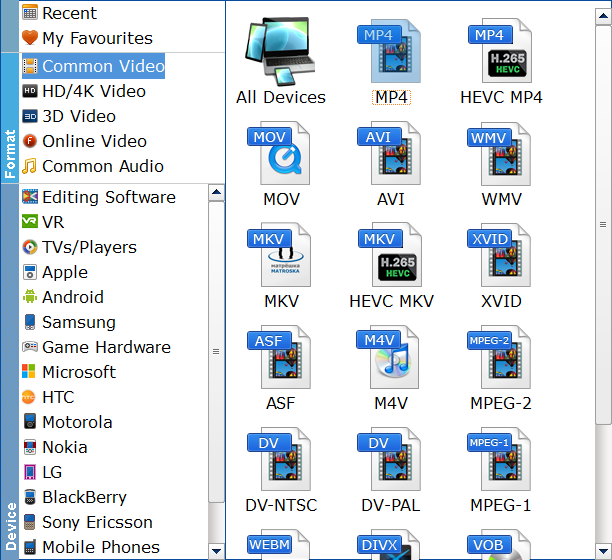
Step 2: Select output profile.
According to YouTube Help Center, a MP4 video format with H.264 video codec and AAC audio codec is the best choice for uploading on YouTube. So here you're recommended to select MP4 (codec: h.264+aac) from Common Video category.
Step 3: Edit DVD video for uploading to YouTube. (Optional)
If you want to trim, crop, add watermark or apply effects to the DVD video, just click Edit button. In the "Video Editor" window, you can trim DVD video length, crop video, add watermarks and even adjust video color as you like.
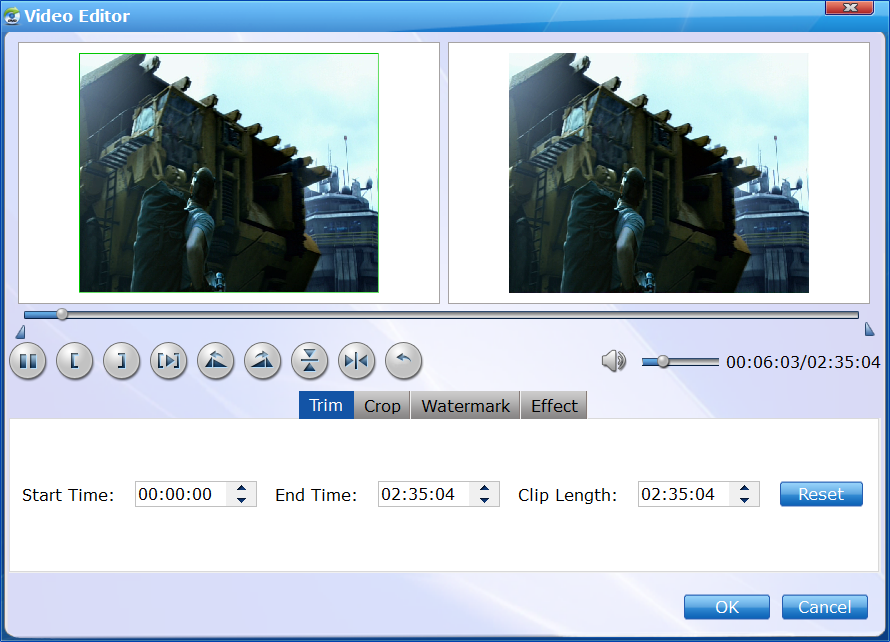
If you want to set video audio parameters, simply click the "Settings" button. Here you can adjust settings like video/audio codecs, bit rate, dimensions, frame rate, audio sample rate, etc. to convert and compress a large-size DVD into a smaller MP4 file.
Note:
- By default, users are allowed to upload videos no longer than 15 minutes. If you want to put longer DVD video on to YouTube, you should verify your account to increase your limit.
- With an up-to-date browser version, you can upload DVD files more than 20GB. And the maximum file size is 128GB and maximum duration is 11 hours.
- YouTube applies 16:9 aspect ratio players. If you are uploading a non-16:9 DVD video, it will be processed and displayed correctly as well, but with pillar boxes (black bars on the left and right) or letter boxes (black bars at the top and bottom) provided by the player. You can use this tool's crop function to get the job done.
Step 4: Start ripping DVD to YouTube.
Click the small Folder button in the Output bar to specify a folder to store ripped DVD video. When all settings are done, you can hit Convert button to get DVD to YouTube conversion started.
Step 3. Upload the Ripped DVD Video to YouTube
Warning: Please do not upload a DVD video that will violate others' copyright or privacy rights to YouTube.
Once the conversion completes, then you're ready to upload the ripped DVD video to YouTube with following steps:
1. Click the Create Button (camcorder icon) next to your profile photo.
2. Hit Upload video.
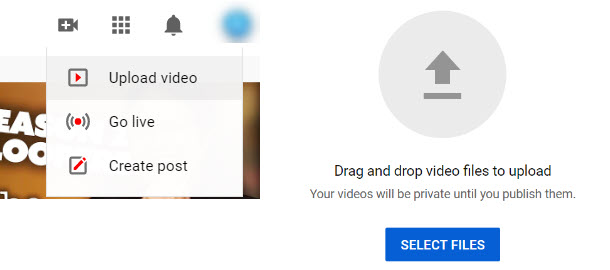
3. Drag and drop the ripped DVD to the uploading box, or select from the folder.
4. Enter video title, description and filling in other information when necessary.
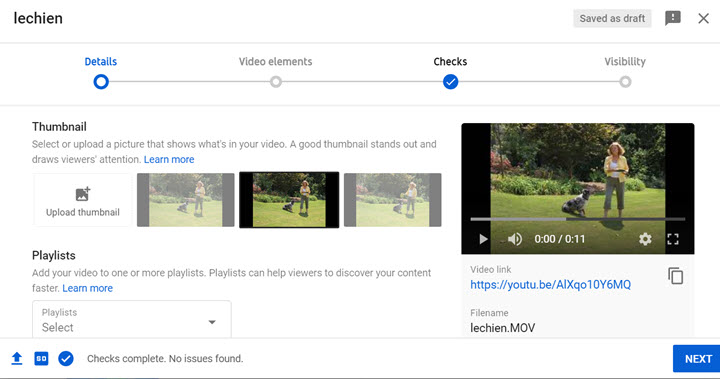
- If you want the video to appear as recommended video for a certain kind, you can enter tags.
- If you want to group the video under a playlist, choose a playlist from the dropdown menu.
5. Choose the privacy settings of your video. You can:
- Make it a private video only visible to you or a specified person;
- Make it an unlisted video, which will not appear in YouTube's search page. But anyone with a link can watch it;
- Or make it a public video that can be found and watched by everyone.

6. Publish the video or save it.
FAQs
1. Is it legal to upload DVD content to YouTube?
Uploading DVD to YouTube for commercial use is not allowed unless you are the first author or the creator of the DVD video. If you upload a DVD to YouTube with unlicensed contents, the video will be blocked, even if you mark the uploaded video as private.
2. Is there a way to upload a scence or a few minutes of a DVD to YouTube?
Yes. EaseFab DVD Ripper has a trim feature with which you can select desired video clip to rip. The trim tool can be found after you click the Edit button on EaseFab DVD Ripper.
3. Can I upload VTS file to YouTube?
No, you can't directly upload Video_TS folder to YouTube unless you convert it to MP4 or other YouTube supported format. The same also applies to VOB to YouTube uploading.